‘Scape User Guide

1. Developer Mode
In order to Download ‘Scape, you must first initiate Developer Mode on your headset. On the Meta Quest 2 & 3:
-Open the Meta Quest app on your phone.
-Go to Menu > Devices.
-Select your headset.
-Navigate to Headset Settings > Developer Mode and toggle it on.


2. Sidequest
-In order to install ‘Scape, you must download Sidequest on your Mac or PC. For both Mac and -PC:
-Open your internet browser.
-Follow this link and scroll down to select “Advanced Installer.”
-Install the appropriate version for your computer.
3. apk Download
Once your headset is in developer mode and you have Sidequest installed on your desktop/laptop, download the apk file from the drive link. The drive link will be provided when new builds become available for testing. To send the apk file to your headset:
-Download your apk file.
-Open Sidequest.
-Connect your headset to your computer via cable.
-Check to see your headset is connected to the app in the top left corner of the window.

-On the top right of the window, click the icon displaying a folder with a downward pointing arrow.
-When the file explorer window opens, open the apk file.
-After a brief moment, ‘Scape will be available in your headset’s Library.
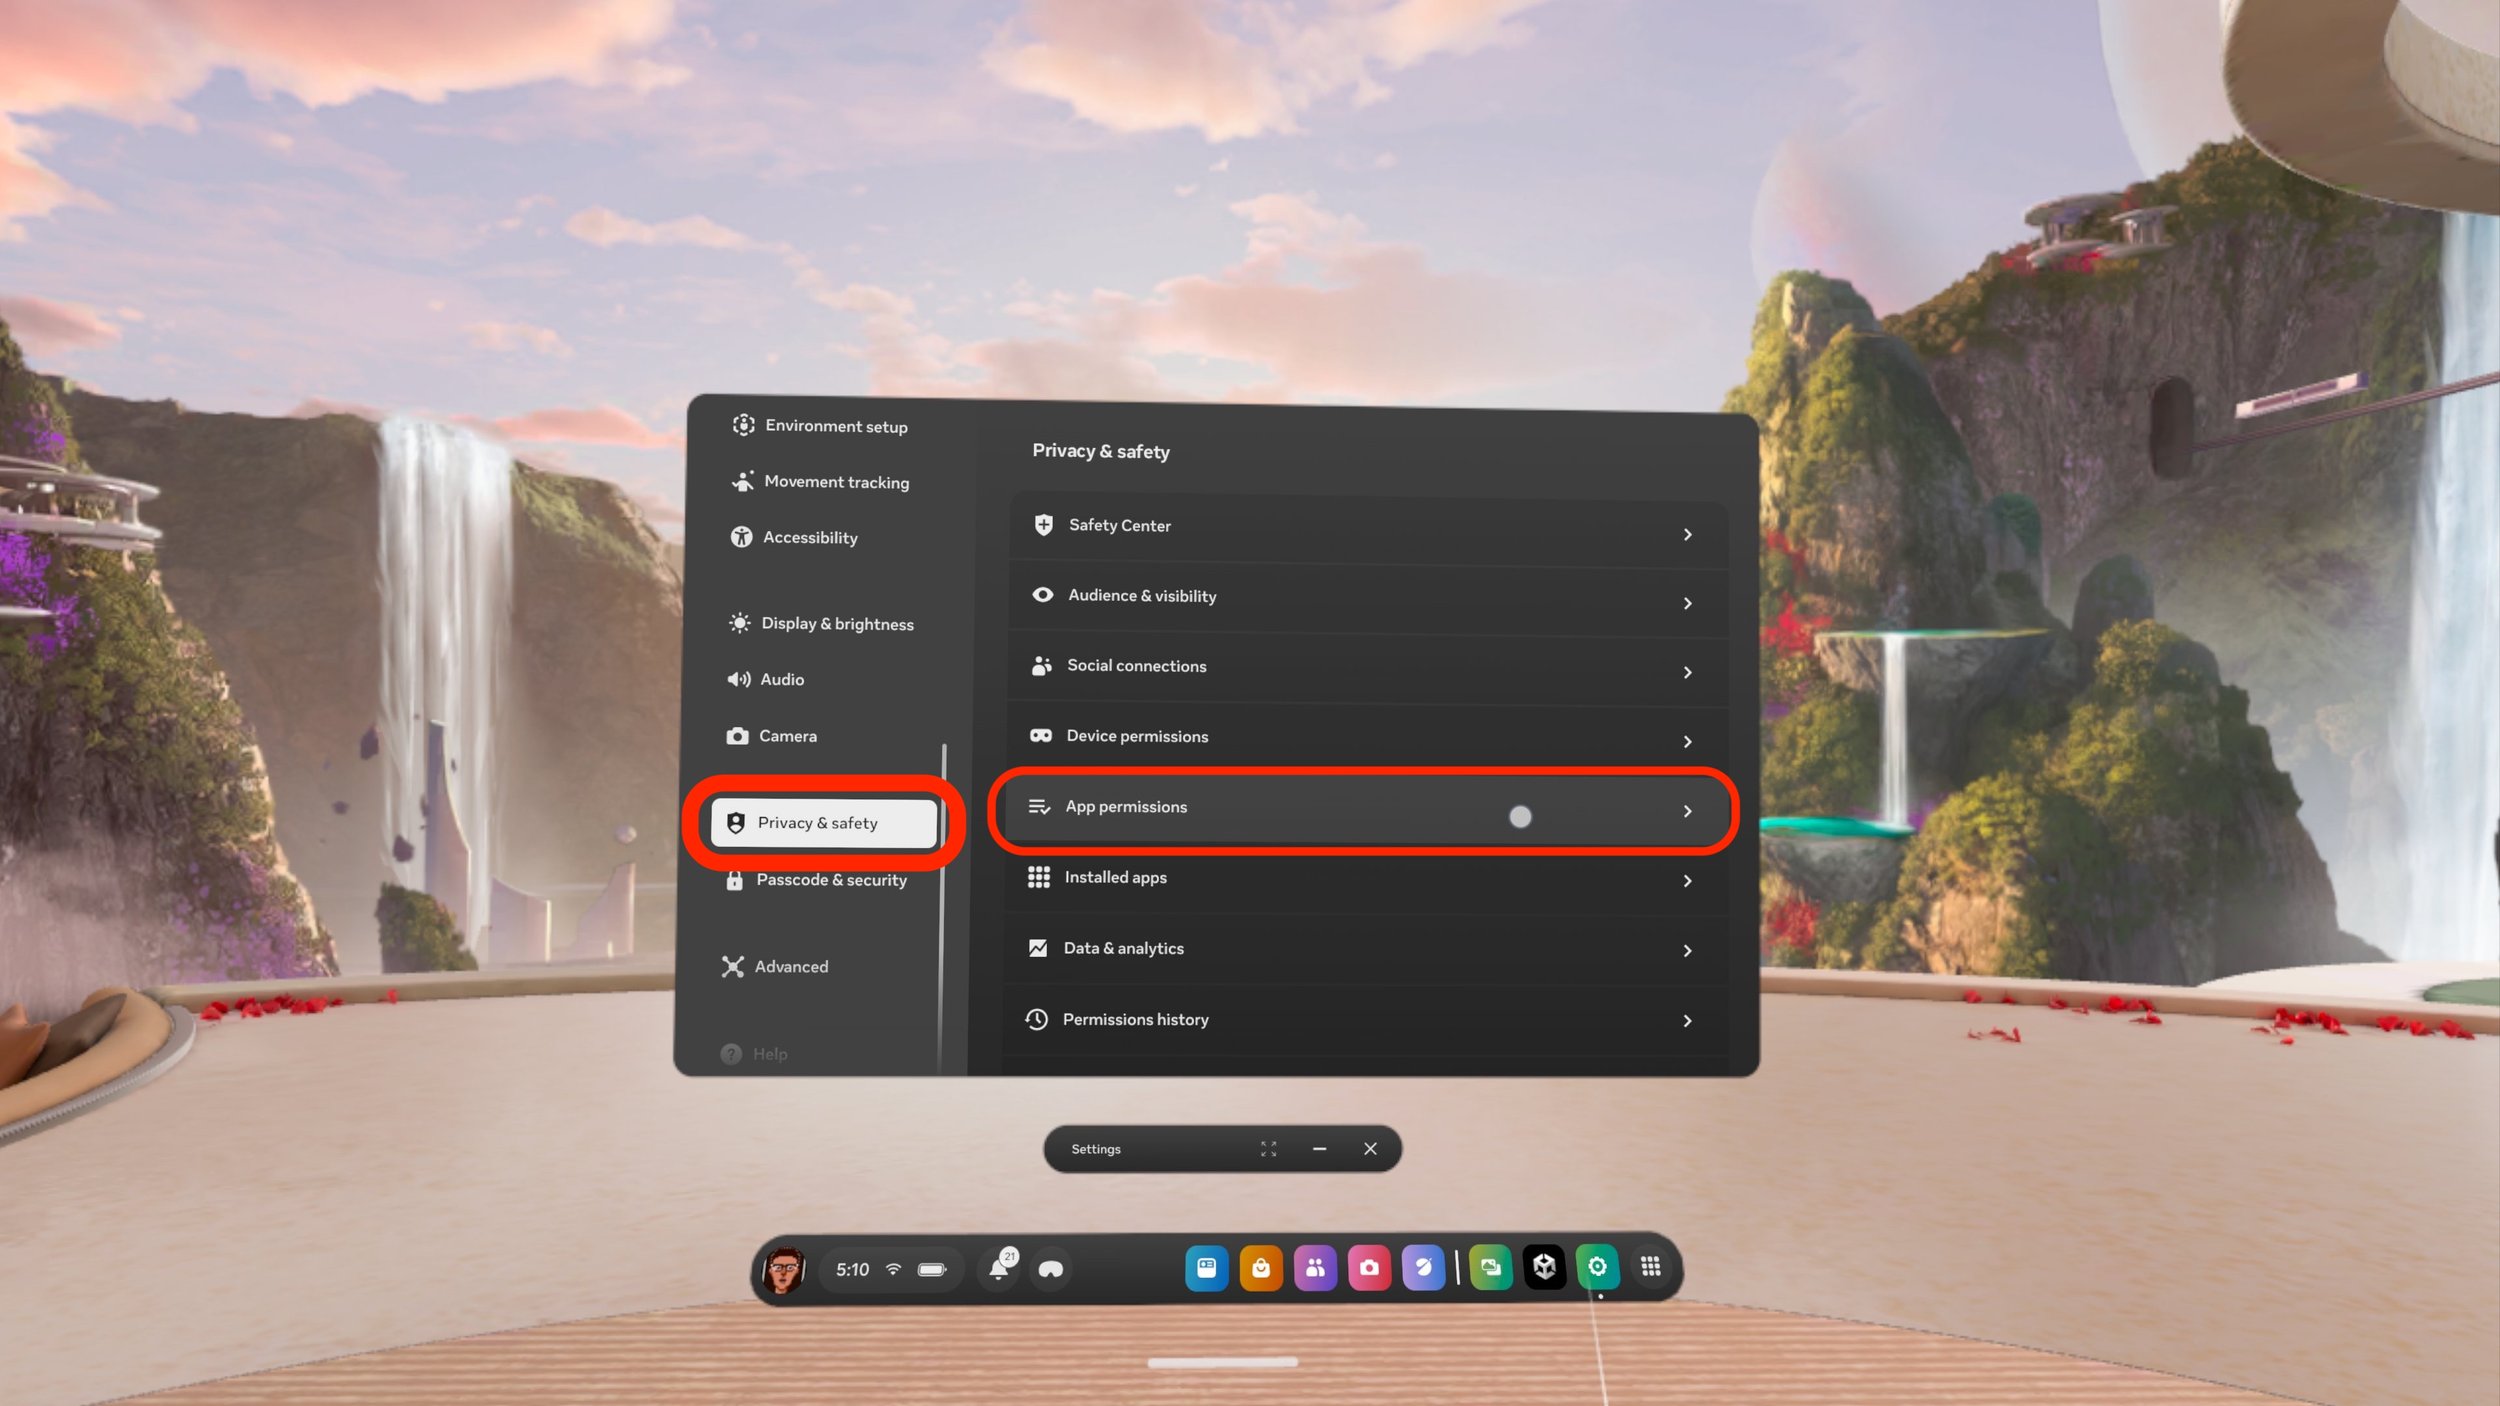
4. Enabling storage access
In order for the app to access your storage, you must allow it in your settings.
-Go to your headset settings.
-Select “Privacy & Safety.”

Select “App Permissions.”
Select “Storage.”
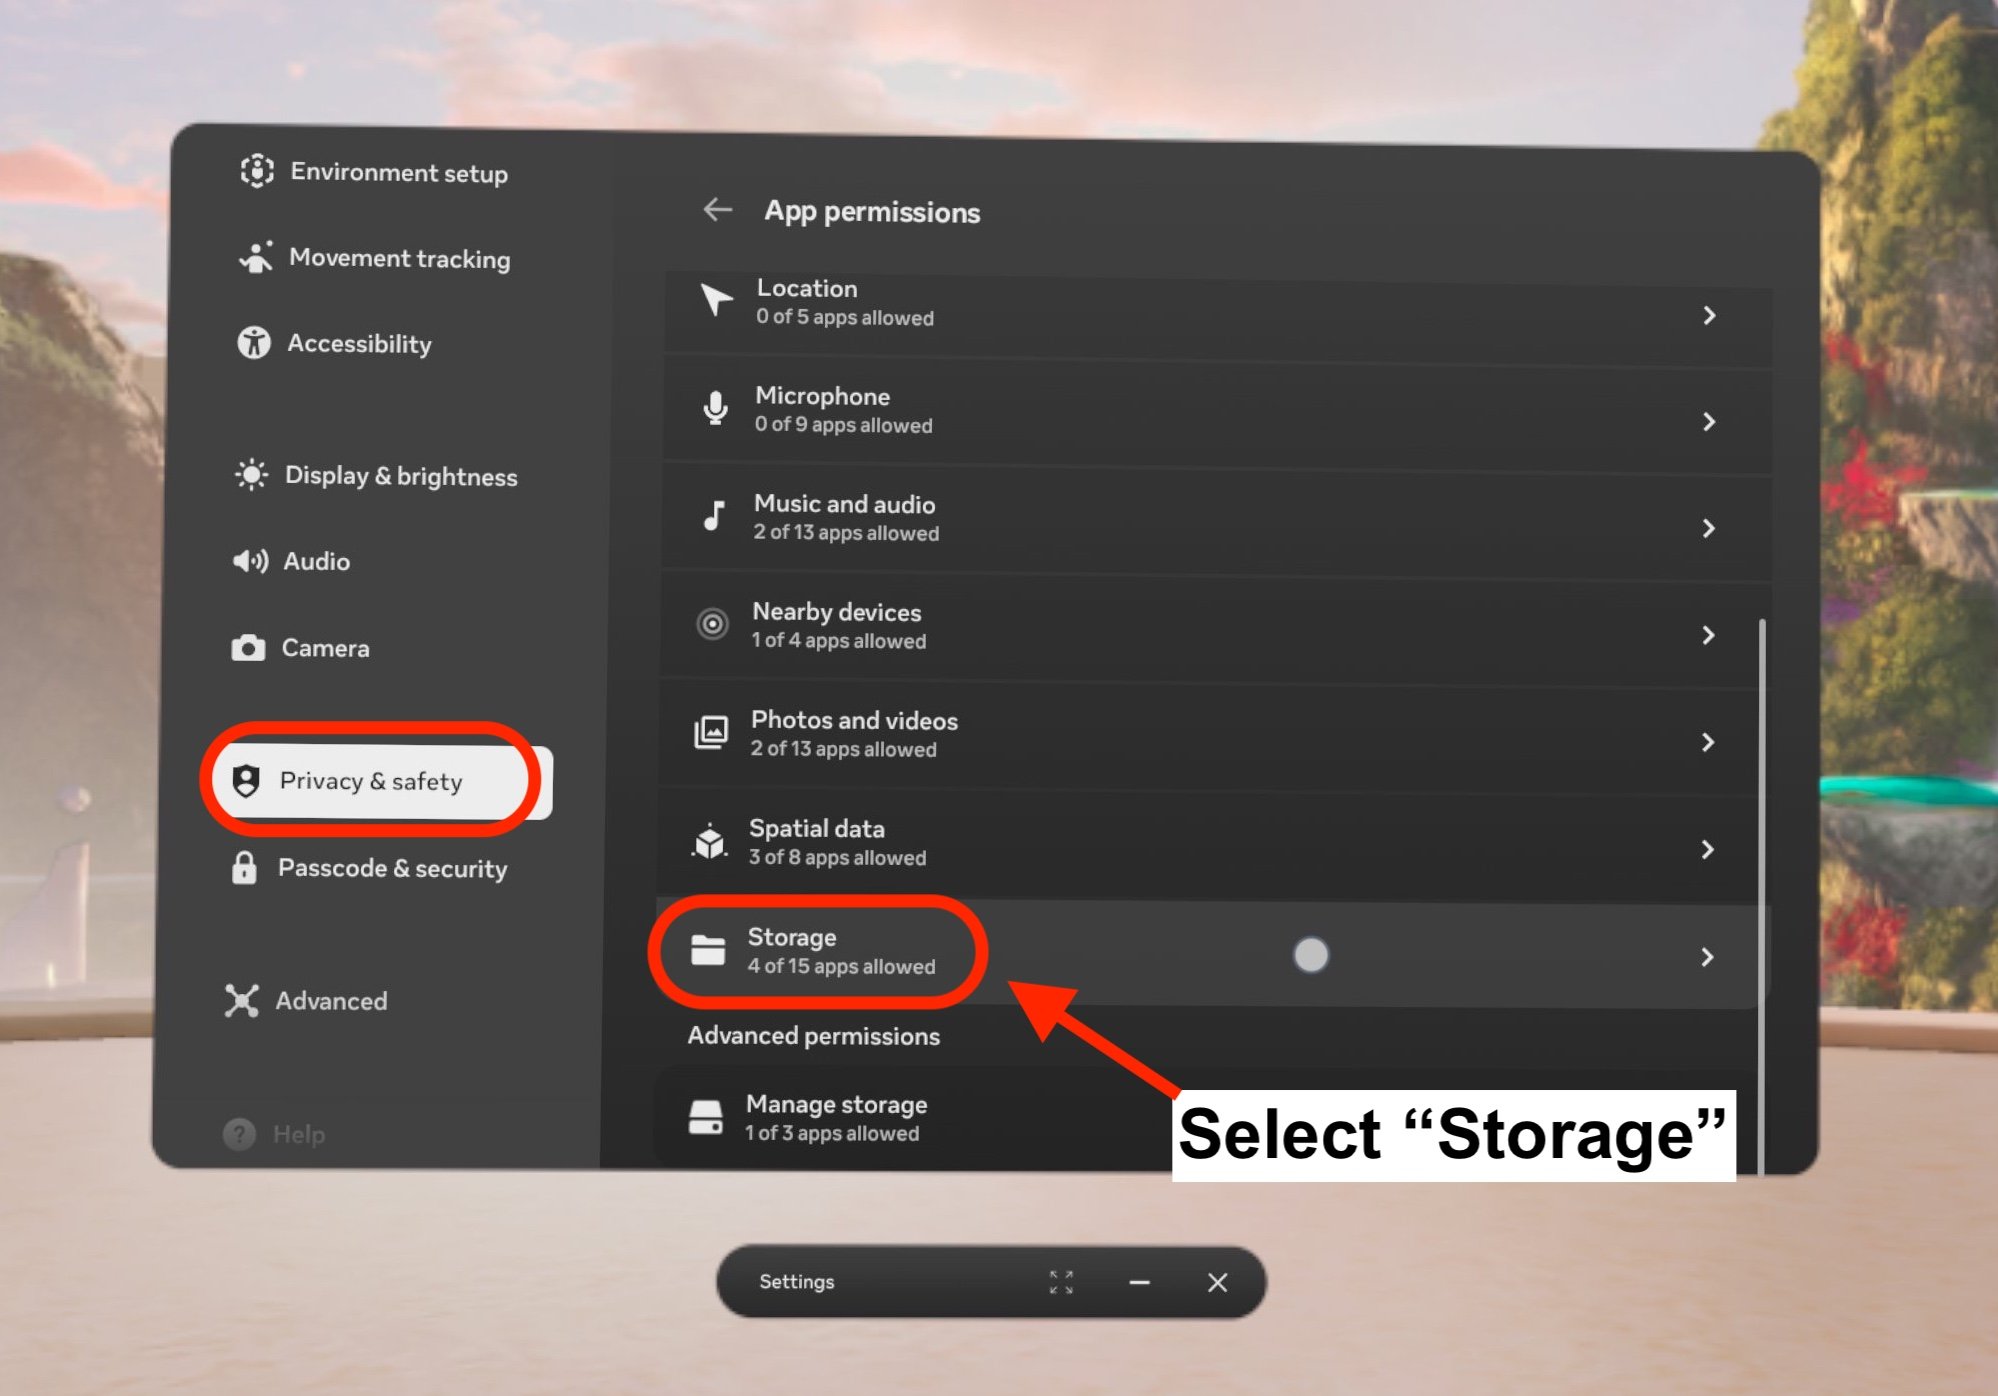
Allow ‘Scape access.

In the Permissions page, under “Advanced Permissions,” select “Manage Storage.”
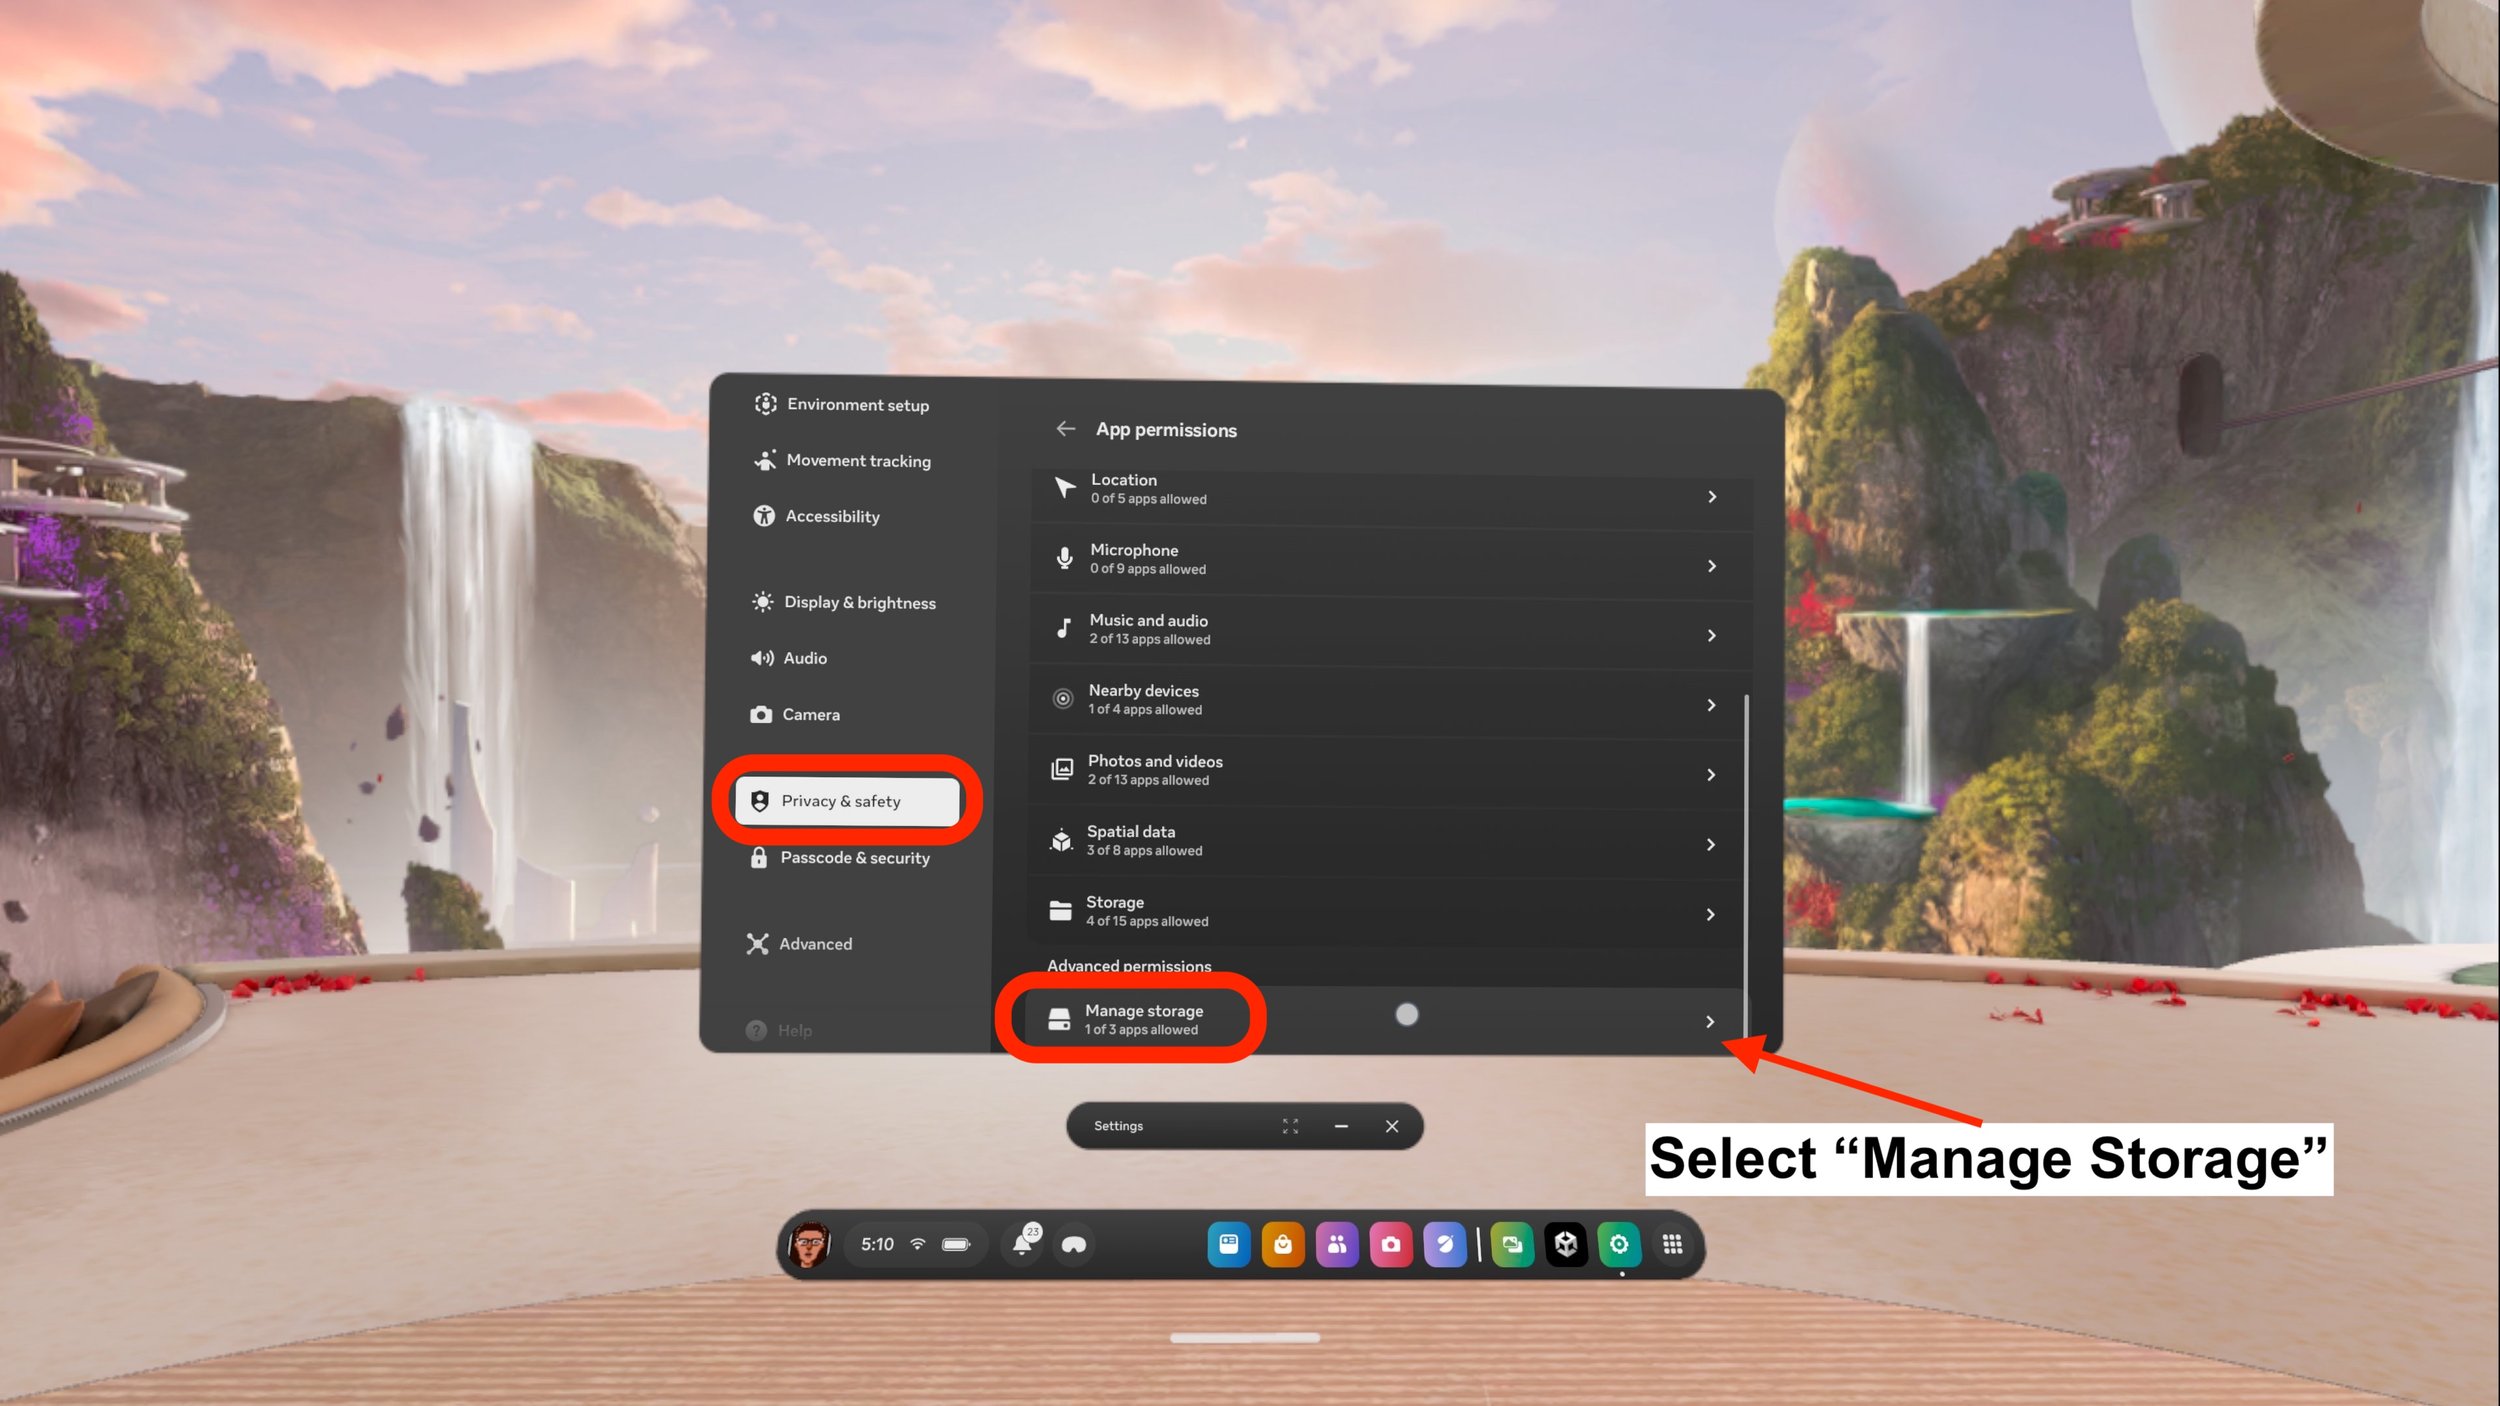
Next to ‘Scape, select “Manage.”
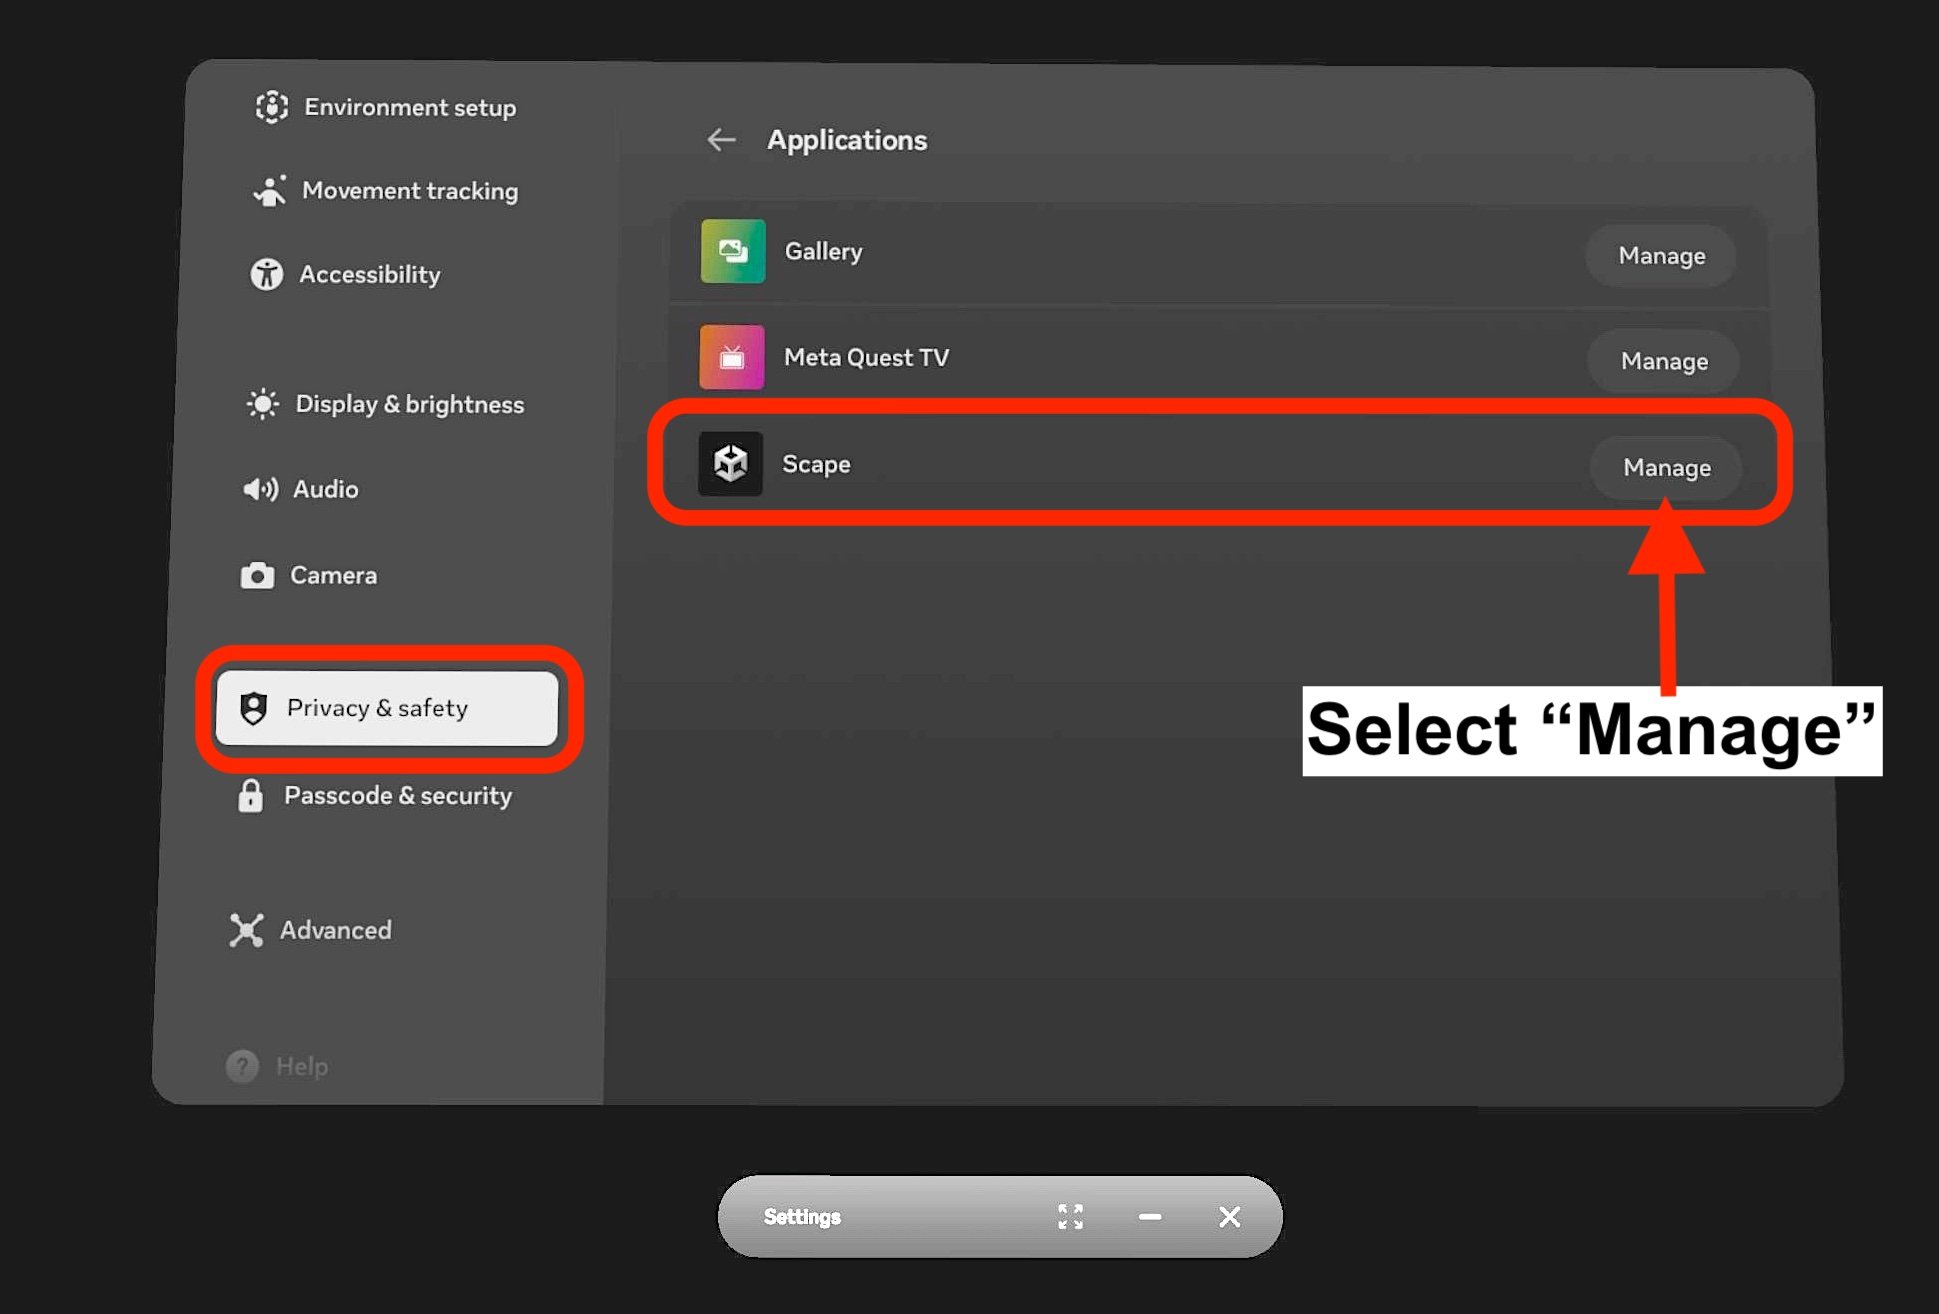
Allow ‘Scape access.
5. Opening the App
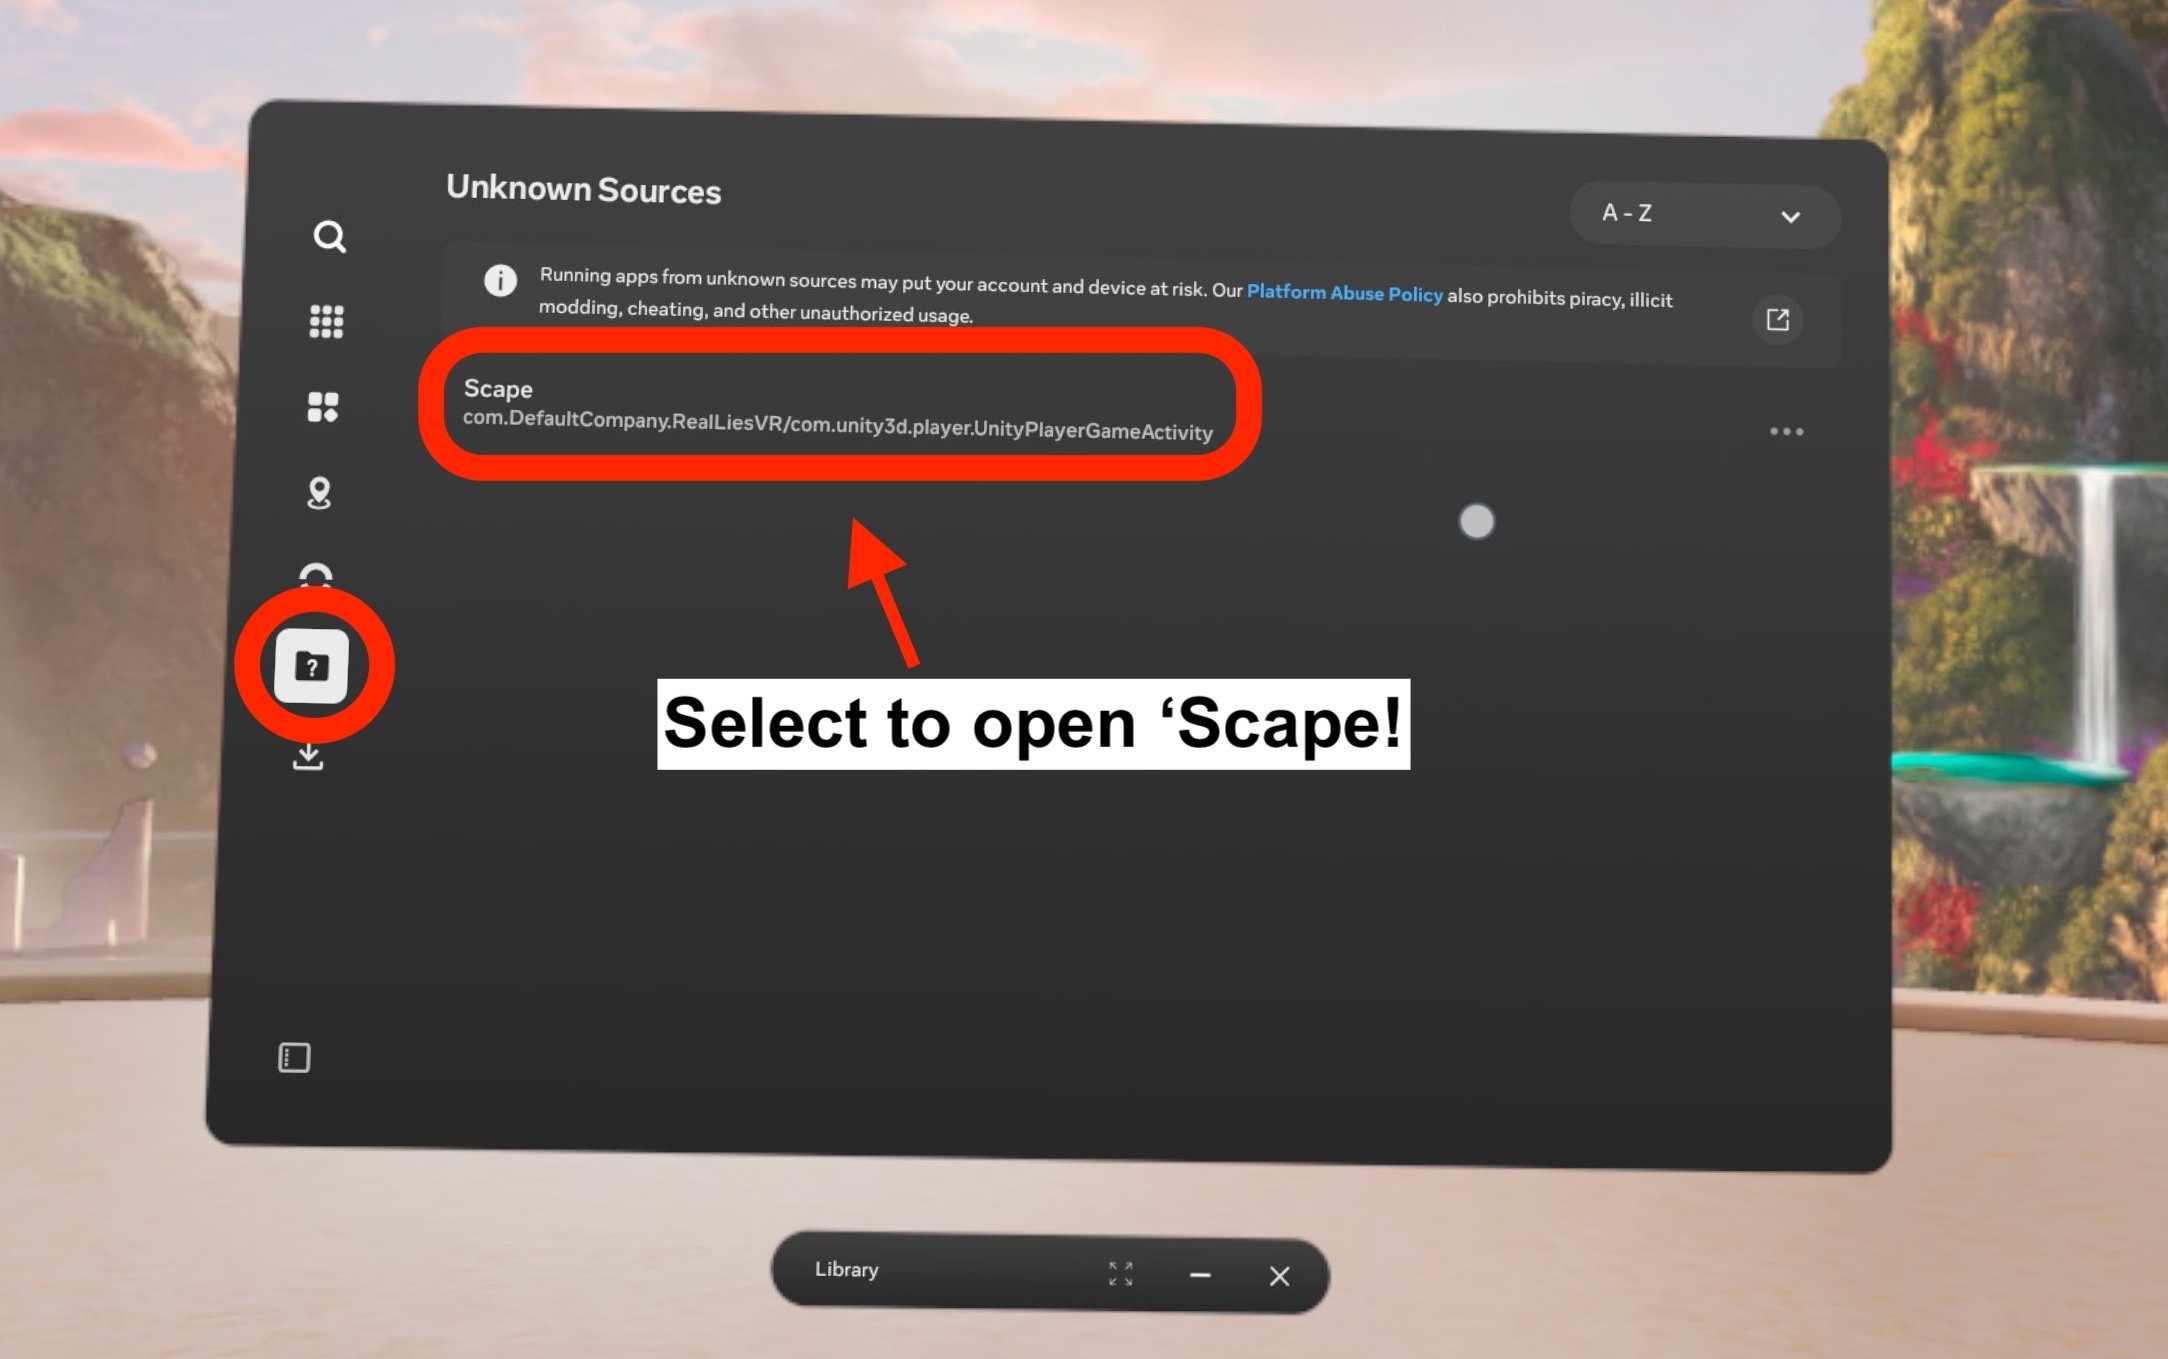
Once ‘Scape has been downloaded, it will be available in the App Library in the “Unknown Sources” tab.
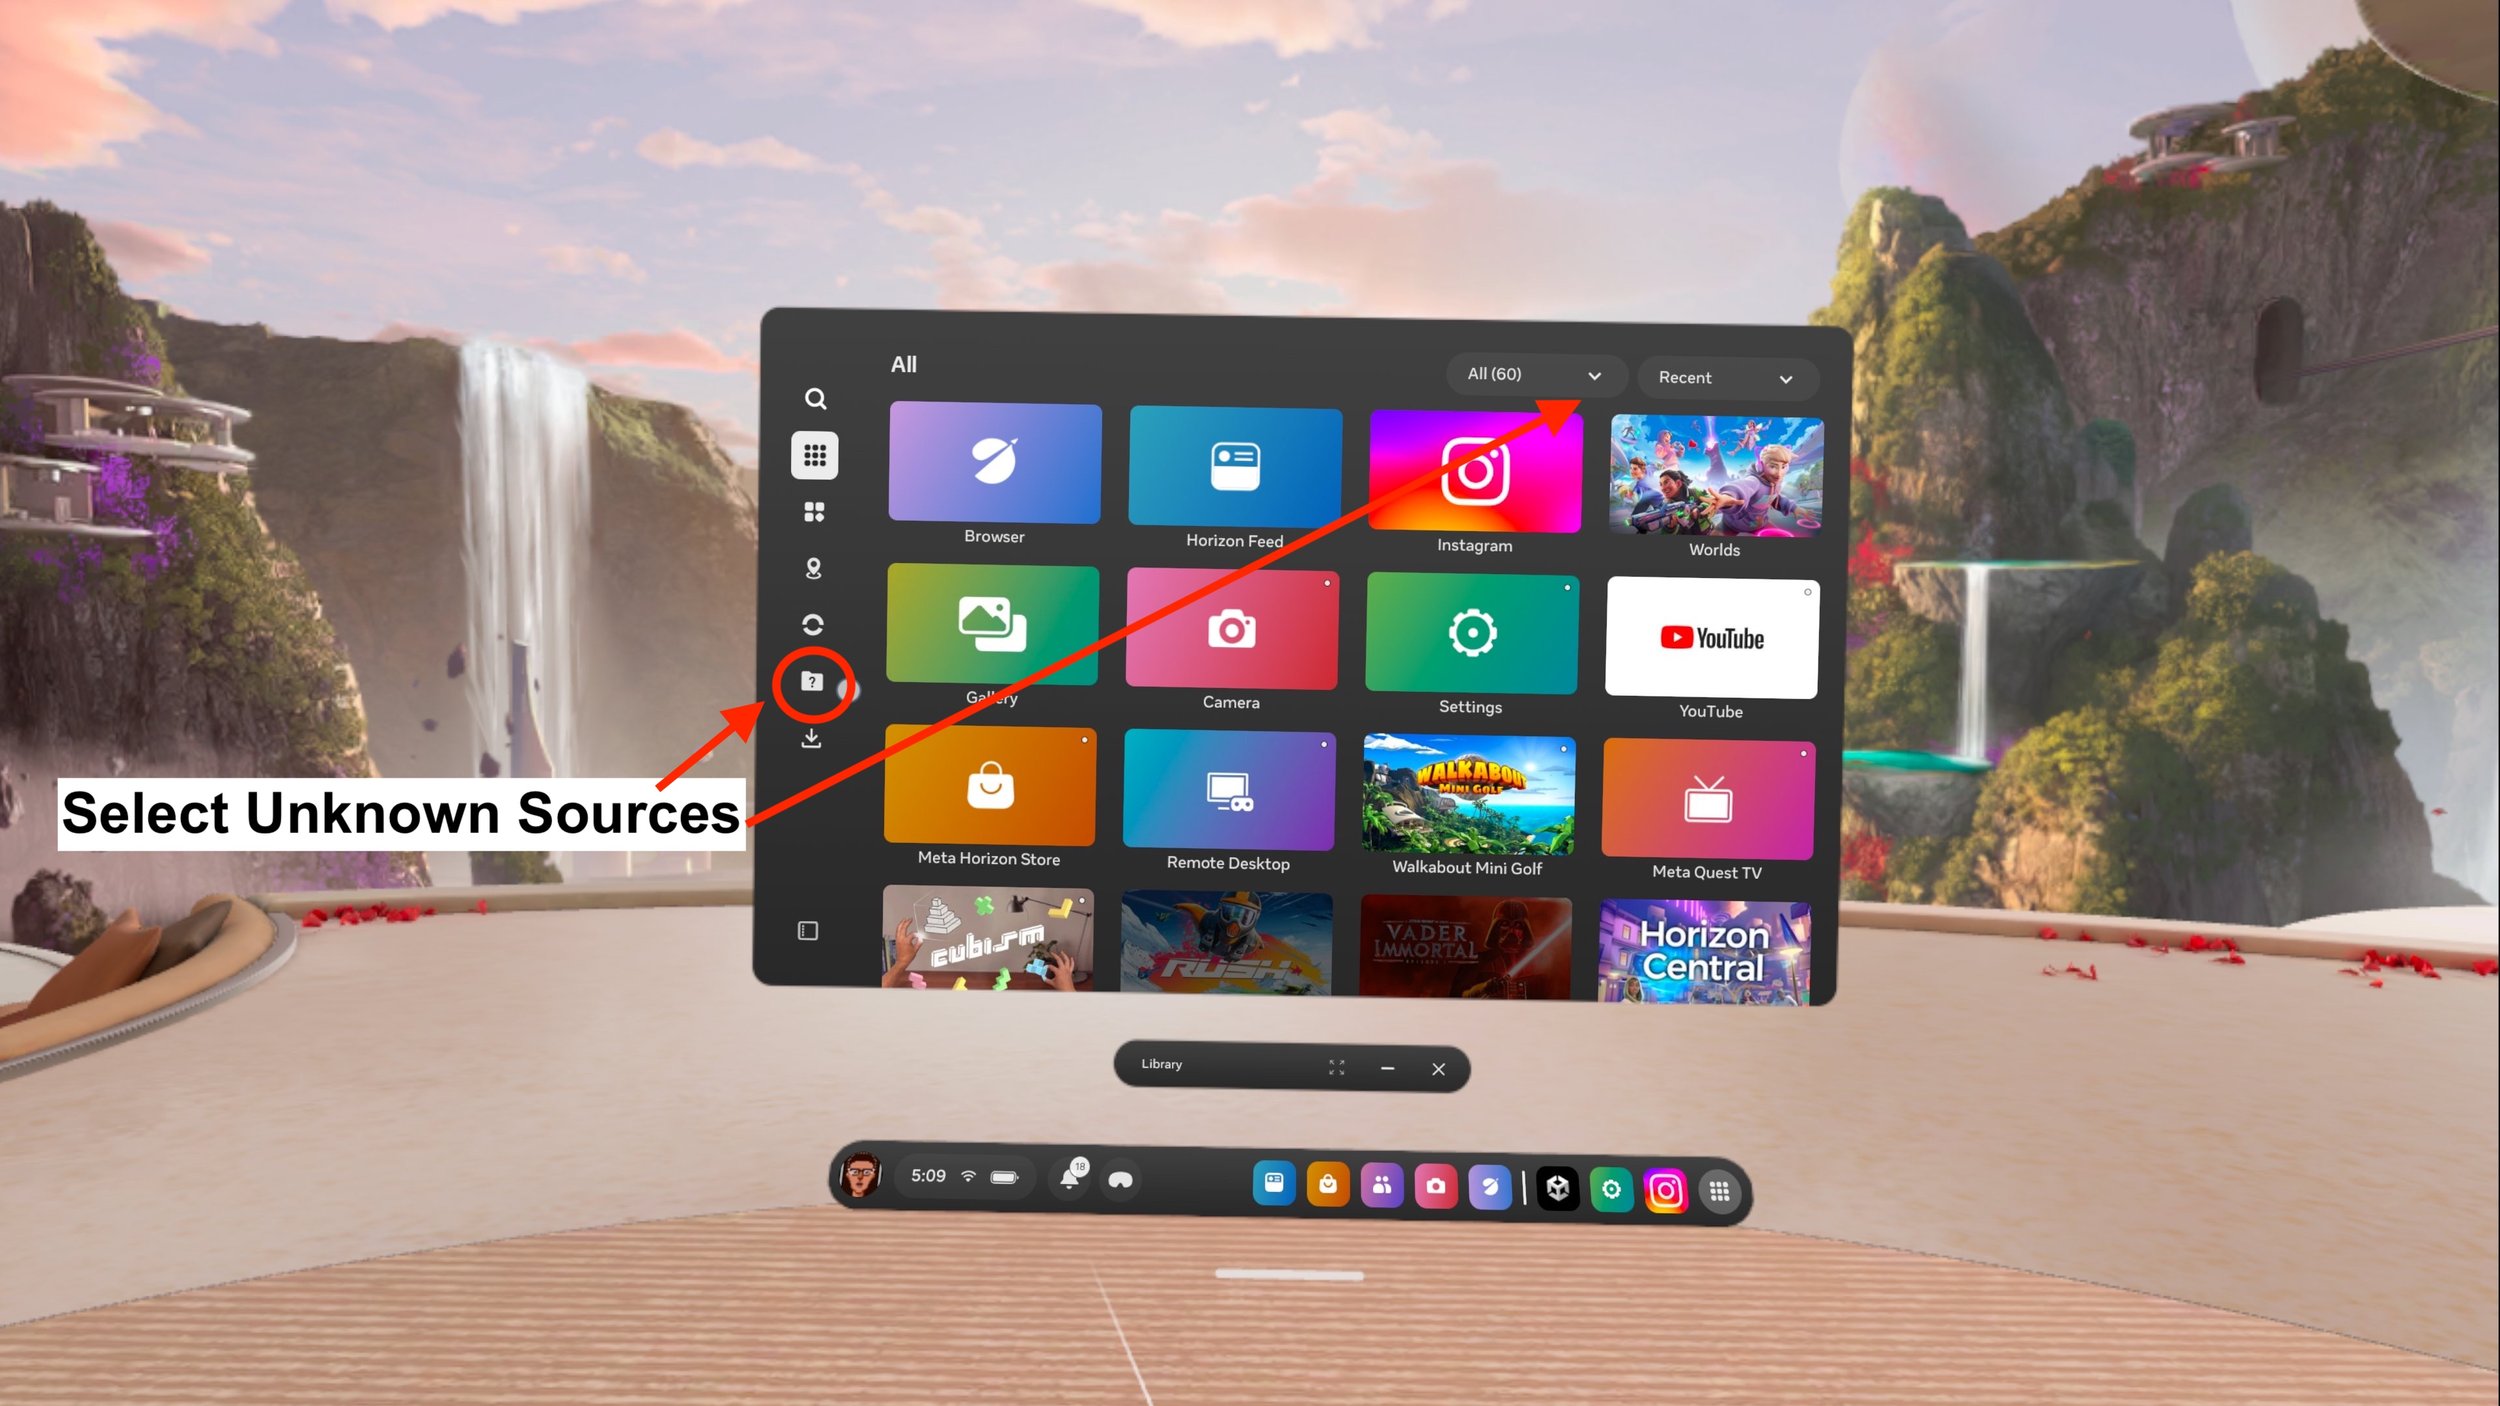
**THE “B” BUTTON ON THE RIGHT HAND CONTROLLER CAN BE USED TO QUICKLY REORIENT THE APP**
6. Account Creation
In order to use ‘Scape, you must link a Google, Apple, or Meta account. Once the app opens, a window will appear and ask you to create an account. Select the appropriate icon for the account you would like to link. Follow the instructions on the pages that appear to create your ‘Scape account.

7. Upload
To upload Spatial Photos and stereo photo pairs:
-On your personal computer, open the Sidequest app.
-Connect your headset to your computer via usb-C cable.
-Confirm the headset is connected to the app. If not, put your headset on and select the pop-up window to “Allow USB Debugging.” You can take your headset off.
-On Sidequest, in the top right of the window, click the “Folder” icon to “Manage files on the headset.”

-Once the file explorer has opened, scroll down to find the “Pictures” folder.
-Drag the image files you wish to import from your computer into the Pictures folder. ‘Scape allows Heic spatial uploads and right/left image pairs.

**THE RIGHT AND LEFT IMAGES MUST BE SEPARATE FILES. ‘SCAPE DOES NOT SUPPORT SBS FILES AT THIS TIME.**
-Once the photos are on the headset, disconnect the cable.
-With your headset on, open the ‘Scape app.
-Open the Upload page at the top of the menu bar on the left.
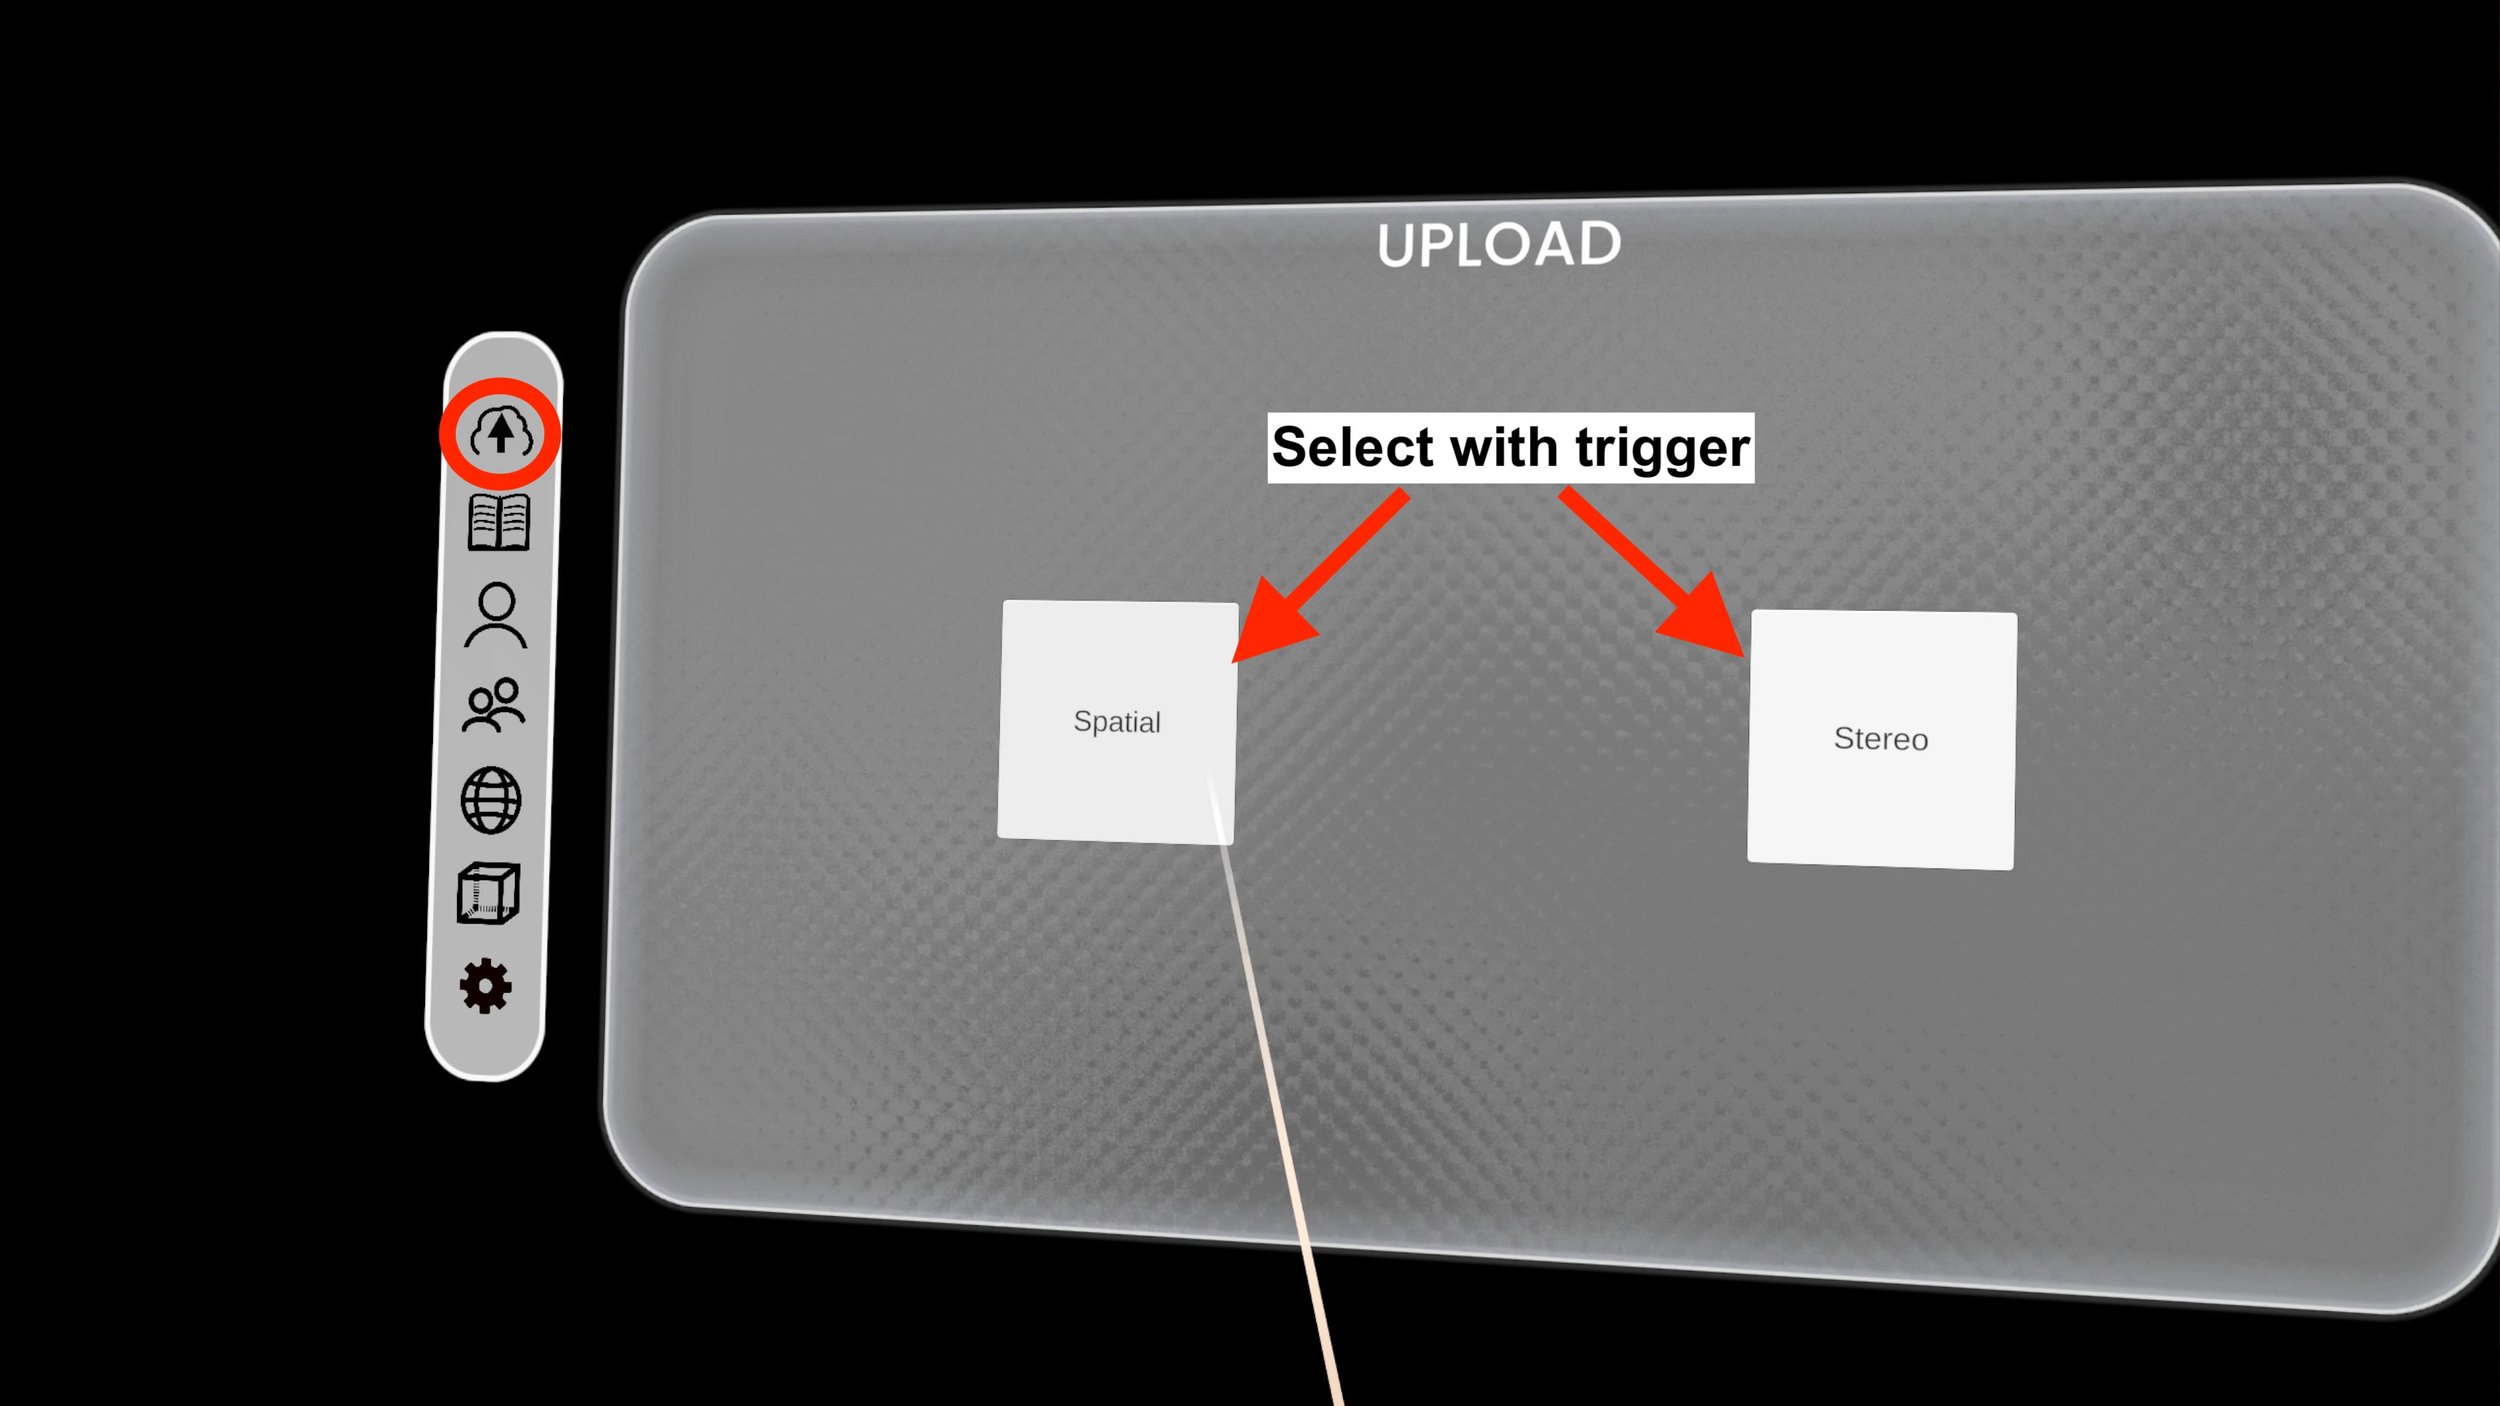
-Choose which type of upload you’d like to begin with: Spatial (iPhone) or Stereo (L/R jpeg or png).
-Try to keep your file size to ~3mb or under for each jpeg or png. Larger file sizes may result in failed uploads.
7.1 Spatial Upload
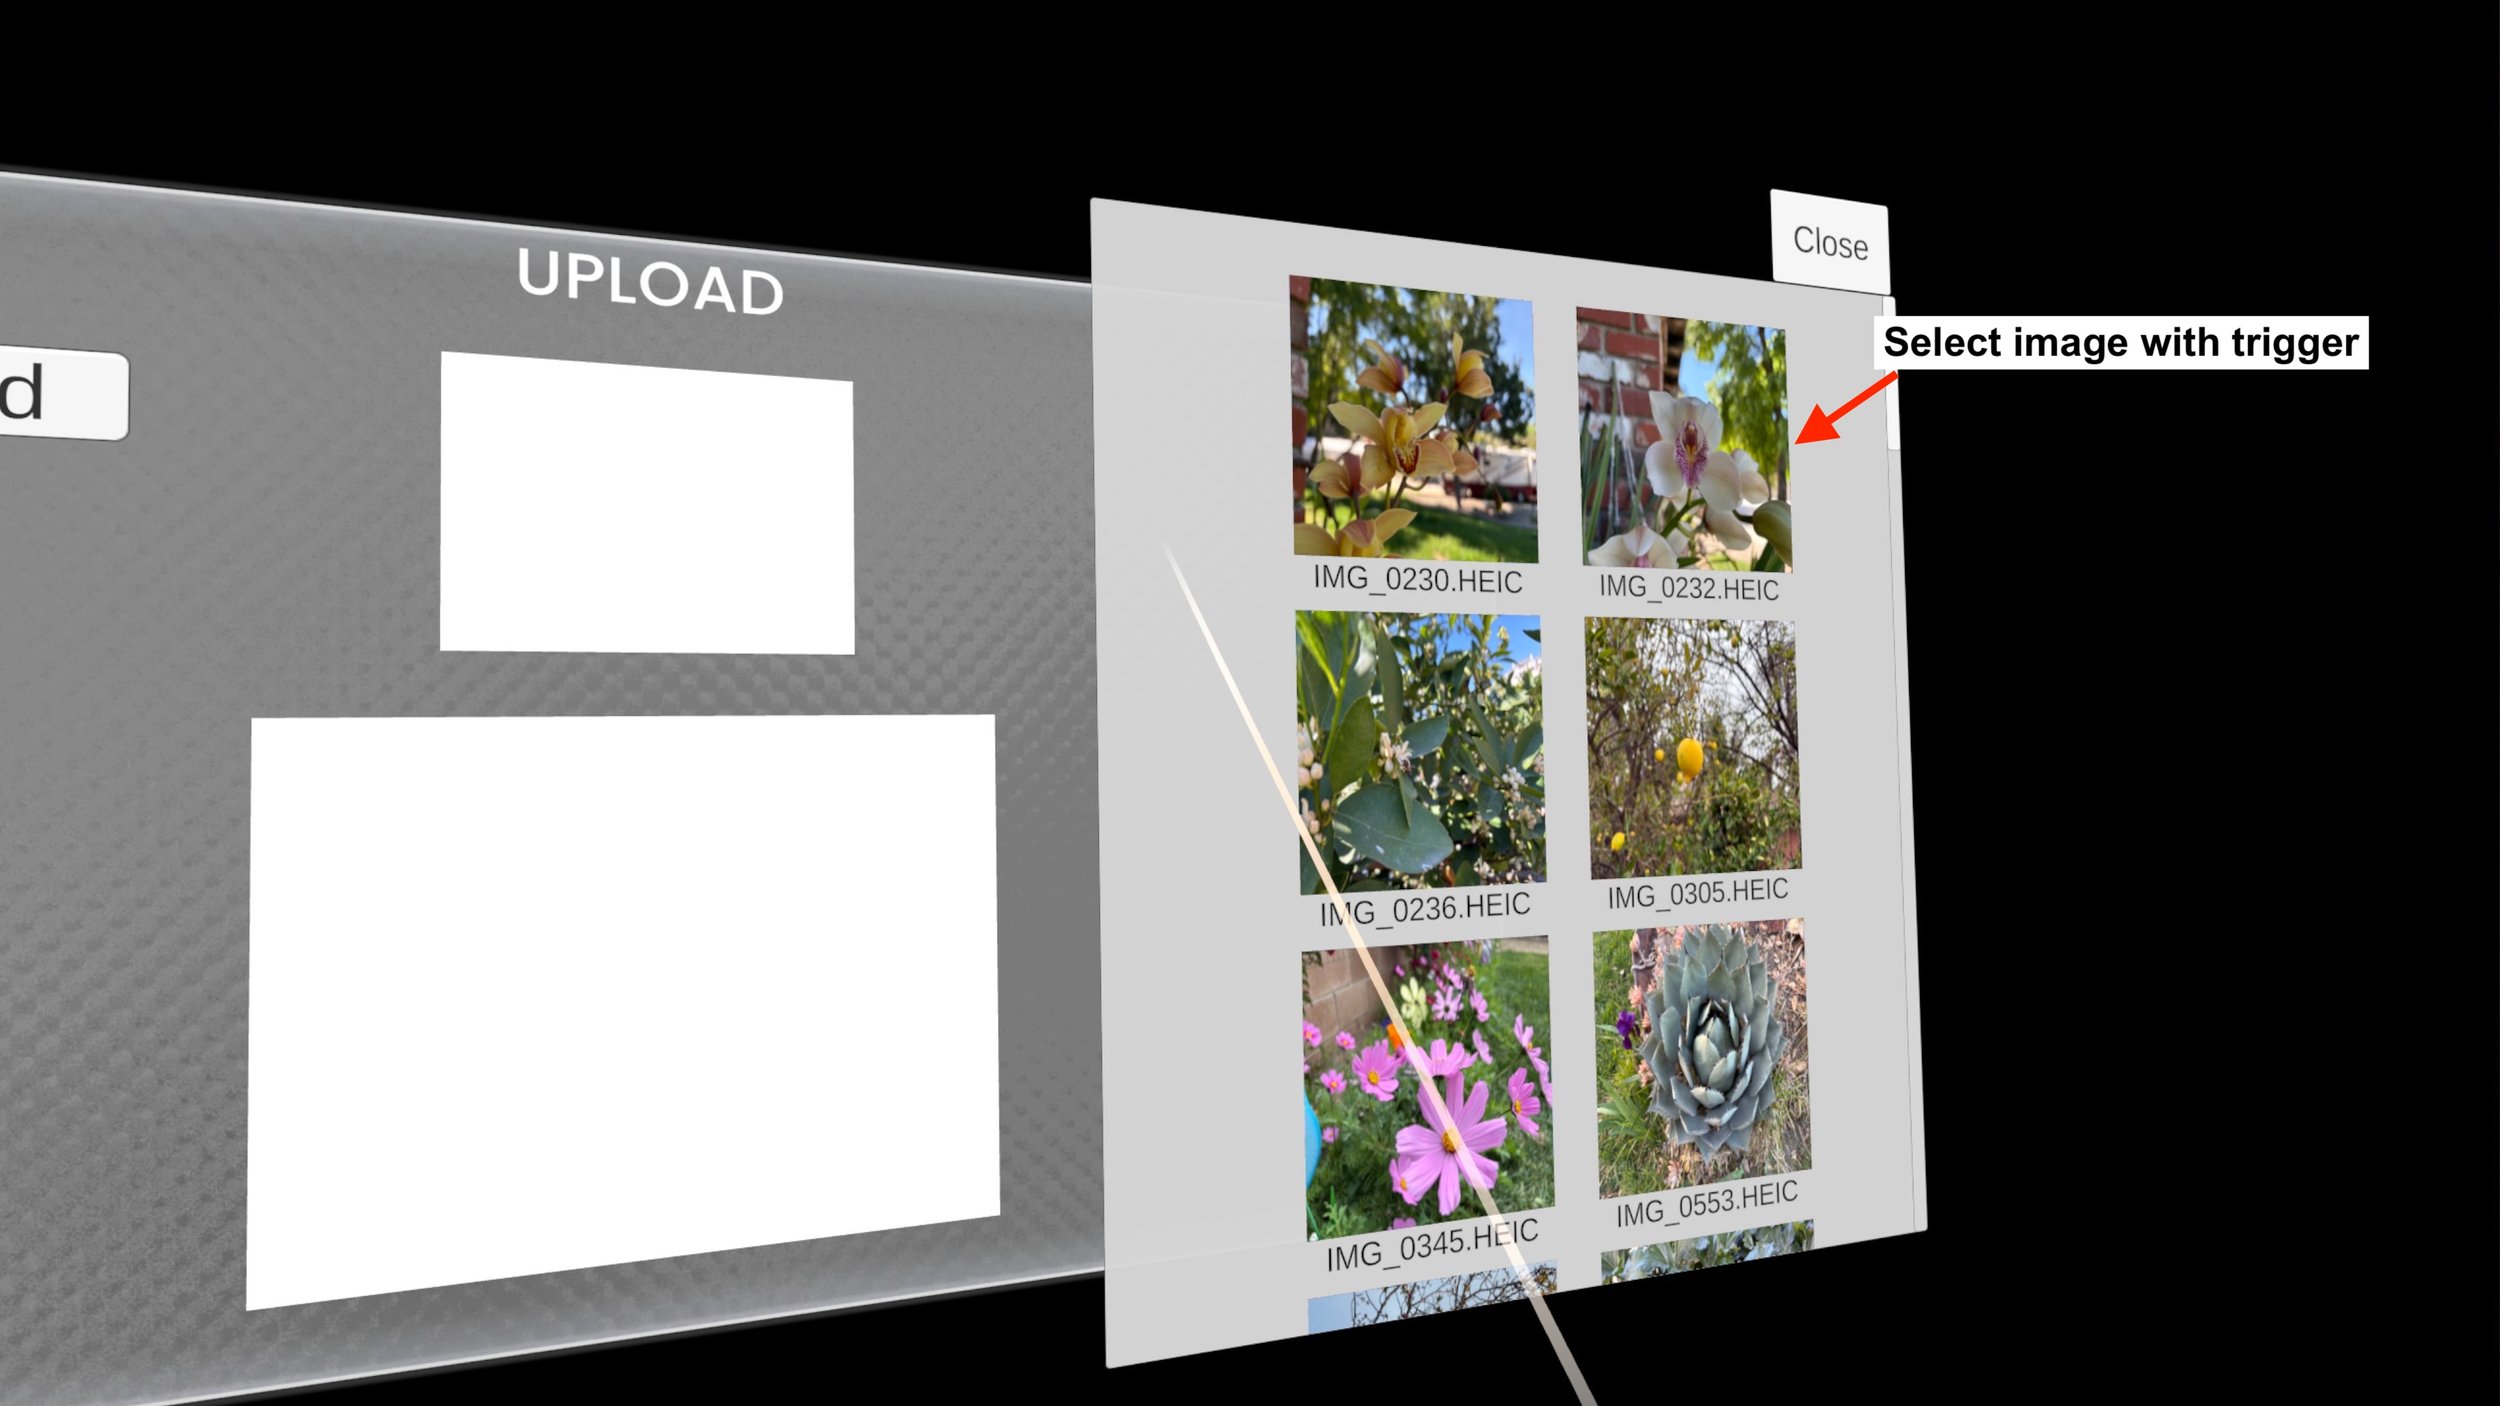
-Select the smaller white box to open the file explorer.

-The file explorer may take some time to load the thumbnails, please be patient.
-Once a thumbnail is visible, that image can be selected for upload.
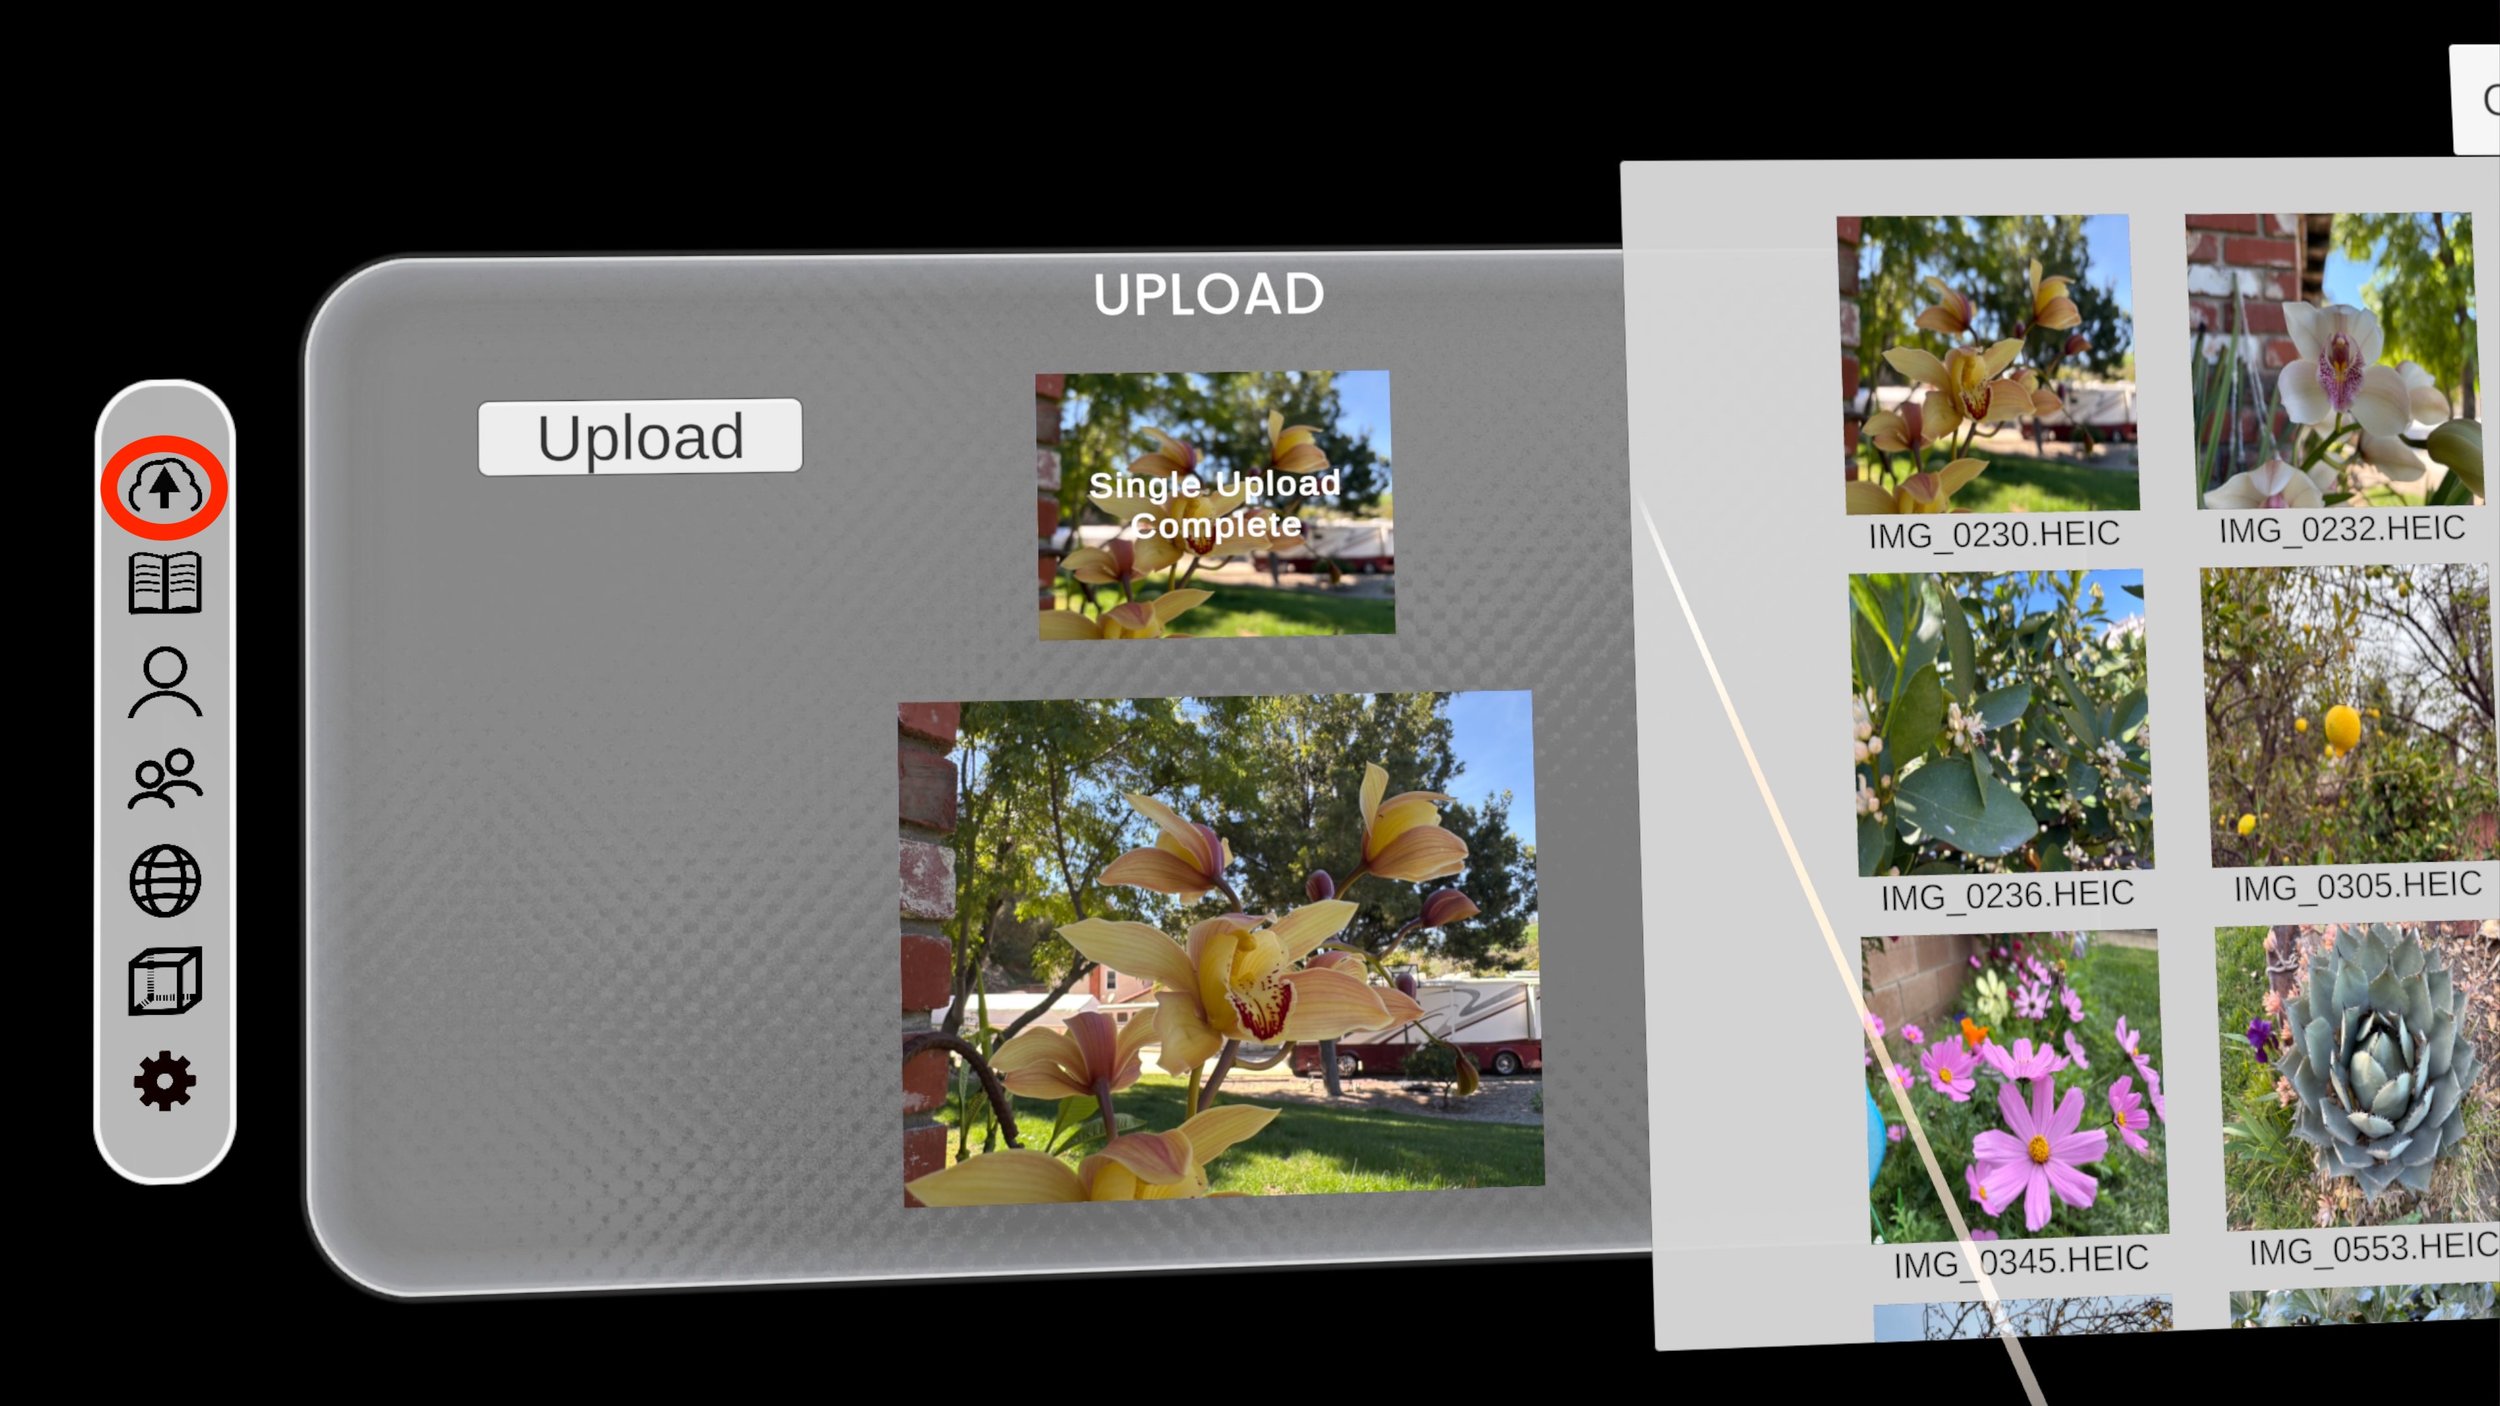
When the image appears in the smaller white box, select the “Upload” button.
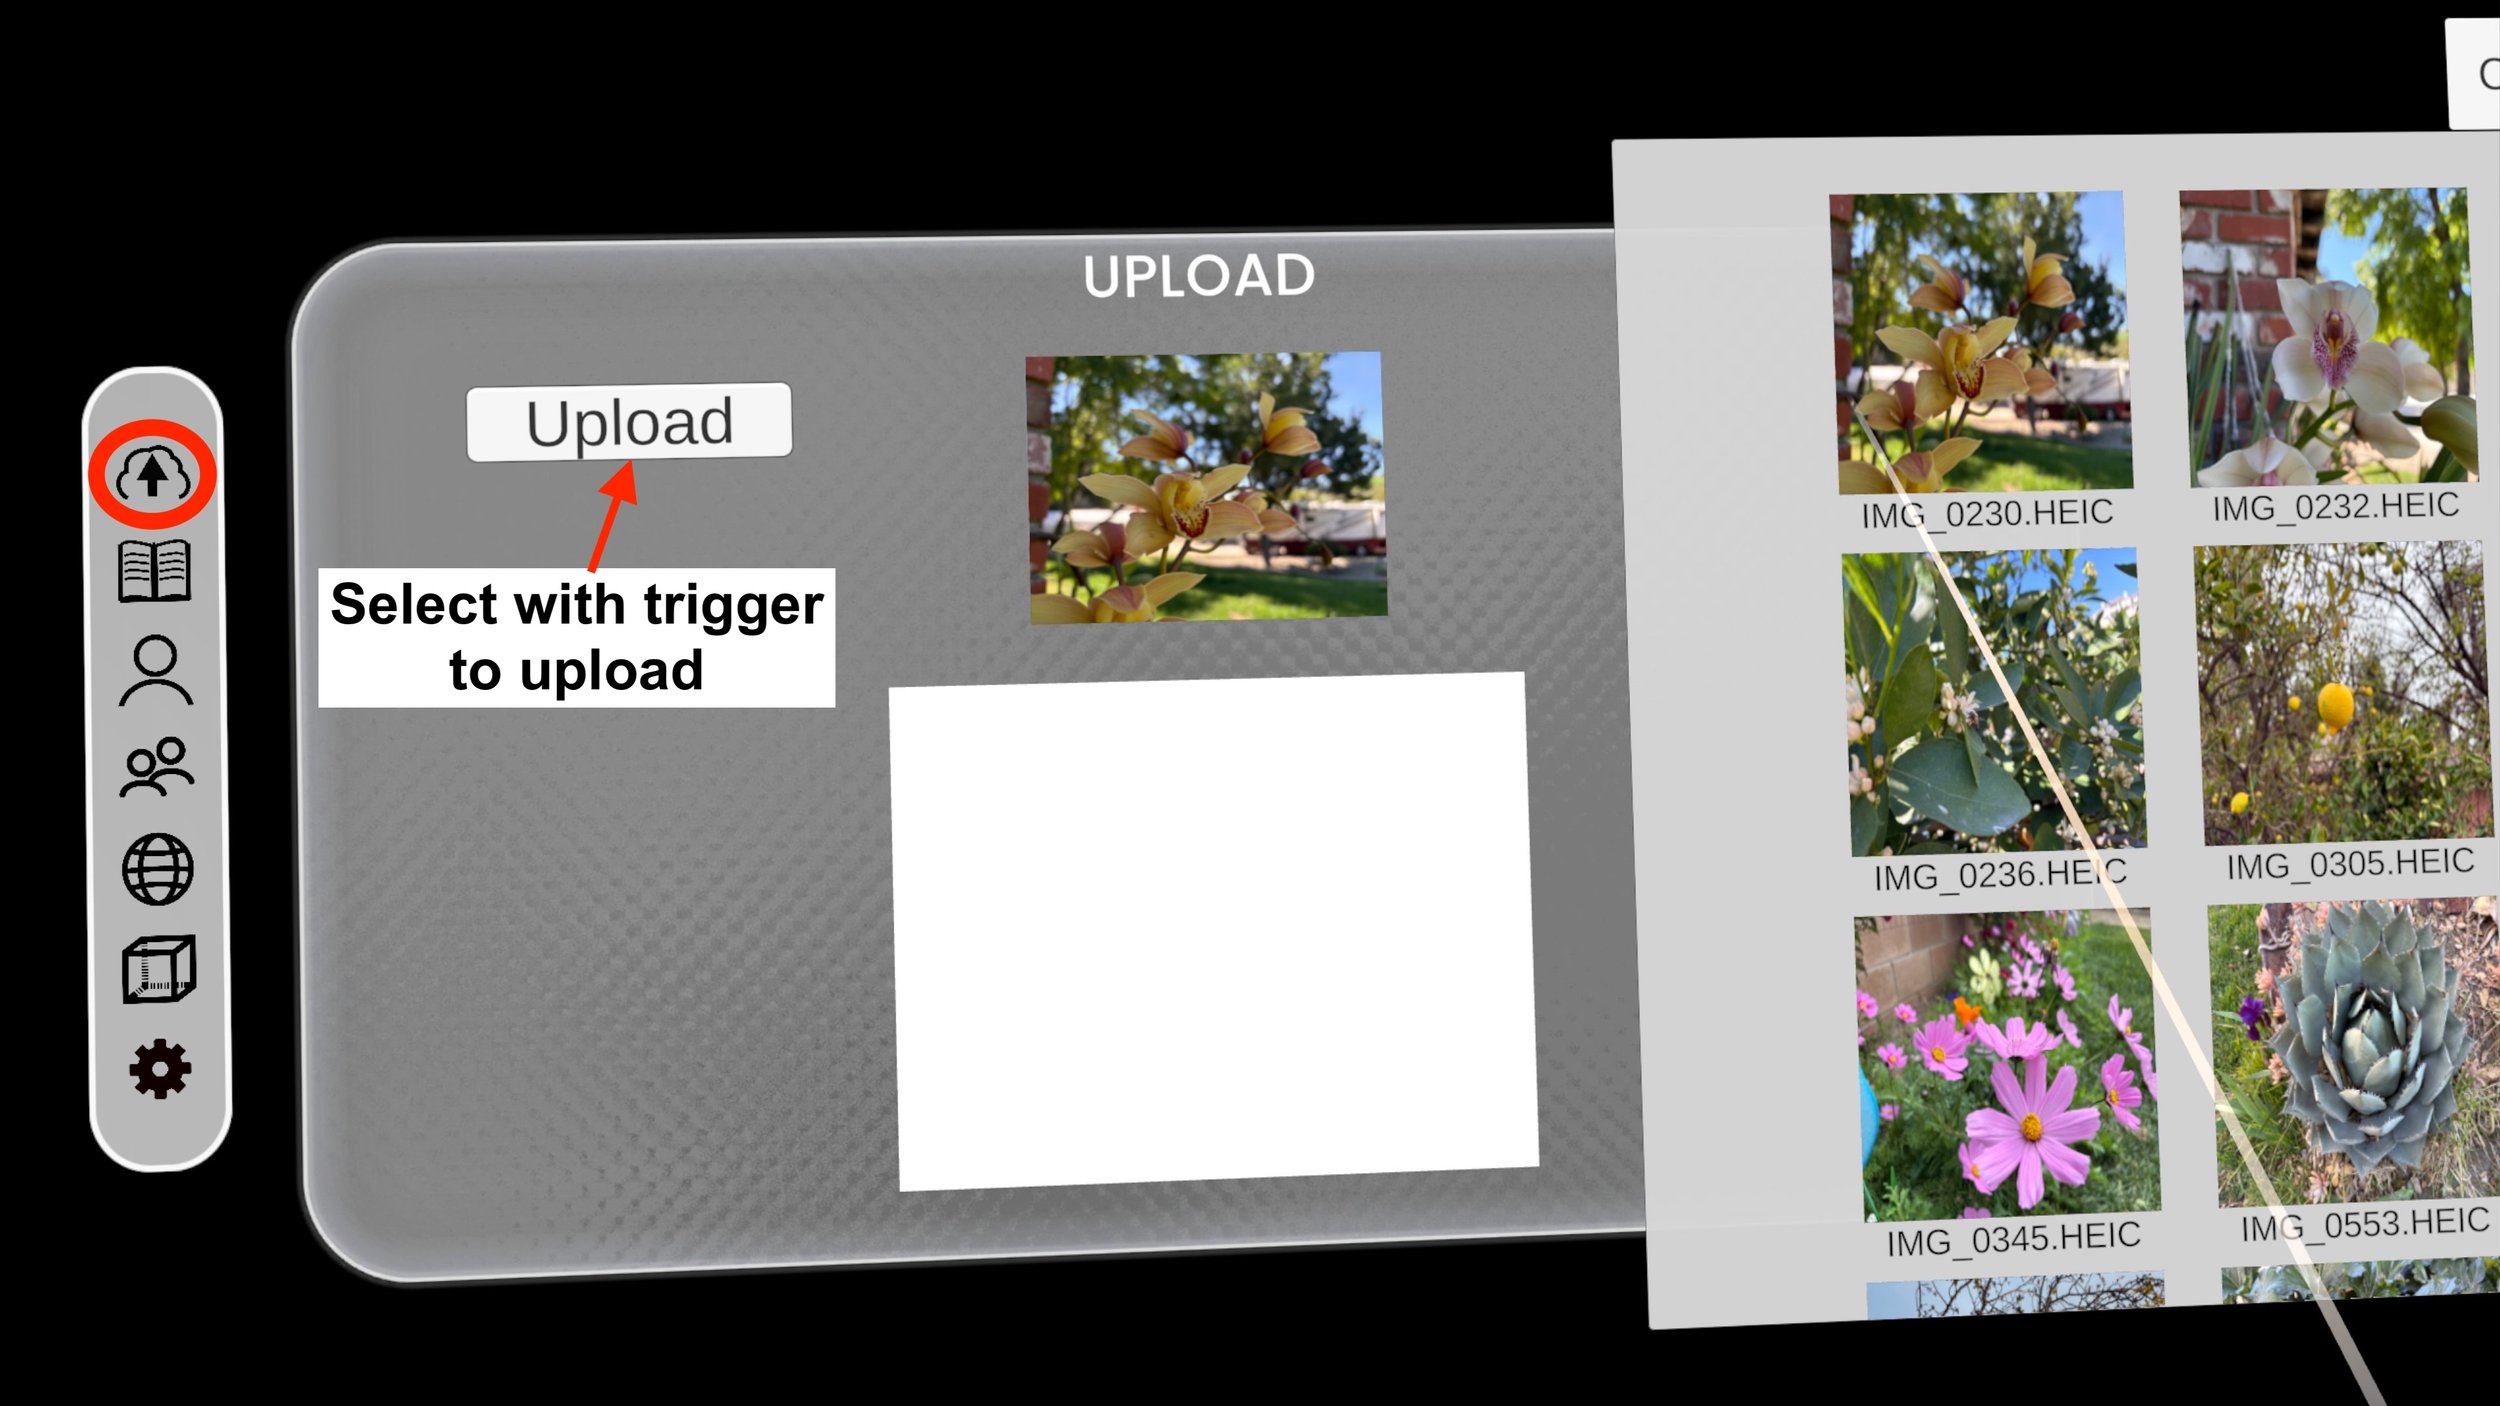
The app will notify you when the upload is complete, and the image will appear in the larger “preview” box.
-Images in the preview box can be expanded with the “grip” button.
-Once an upload is complete, another image can be selected.
*Mac recommended for Spatial Photo Uploads: Airdrop Spatial Photos to Mac then transfer*
7.2 Stereo Upload

-Select the smaller white box on the left or right.
-If the left box is selected, the file explorer will load on the left side of the page and vice versa.


-If the left box is selected, select the left-eye image you would like to upload and vice versa.
-Once the selected image loads and the larger preview is in full 3D, select the “Upload” button.

The app will notify you when the upload is complete and another image pair can be selected.
8. Library

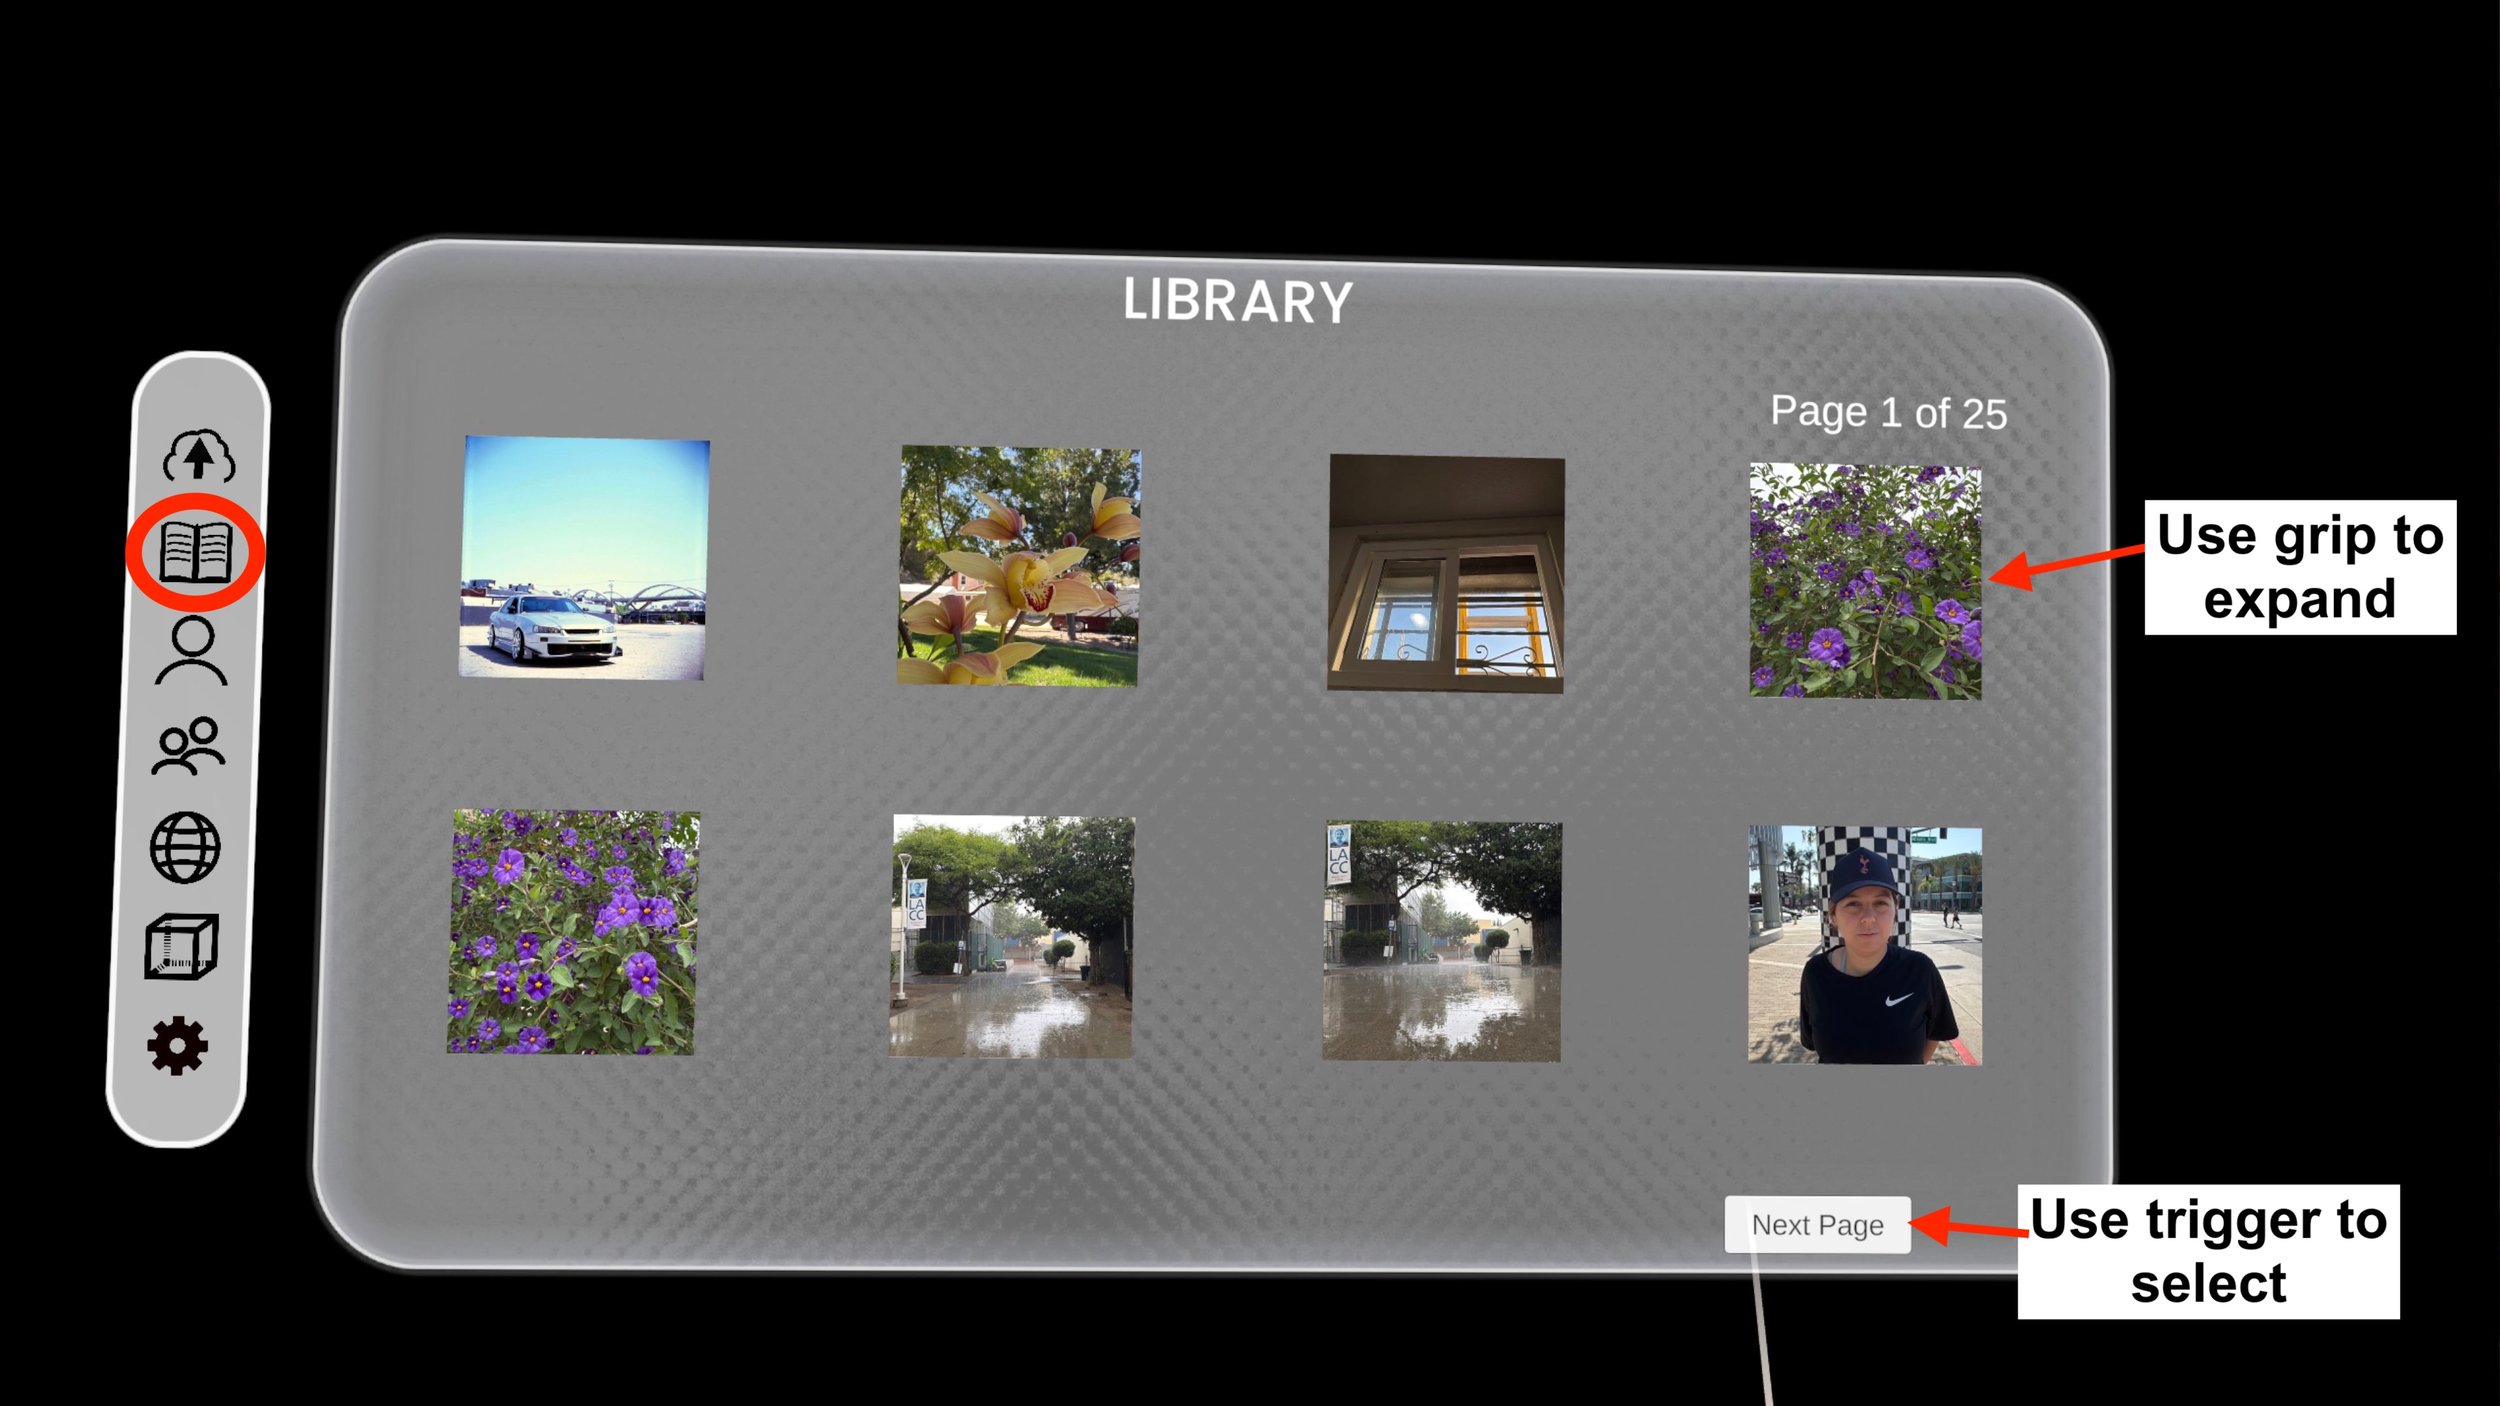
The Library is where the images you uploaded can be viewed. The images are separated into pages of 8. Use the “grip” button to expand and minimize images. The “Trigger” is for operating the various buttons (Next, Previous, etc.).
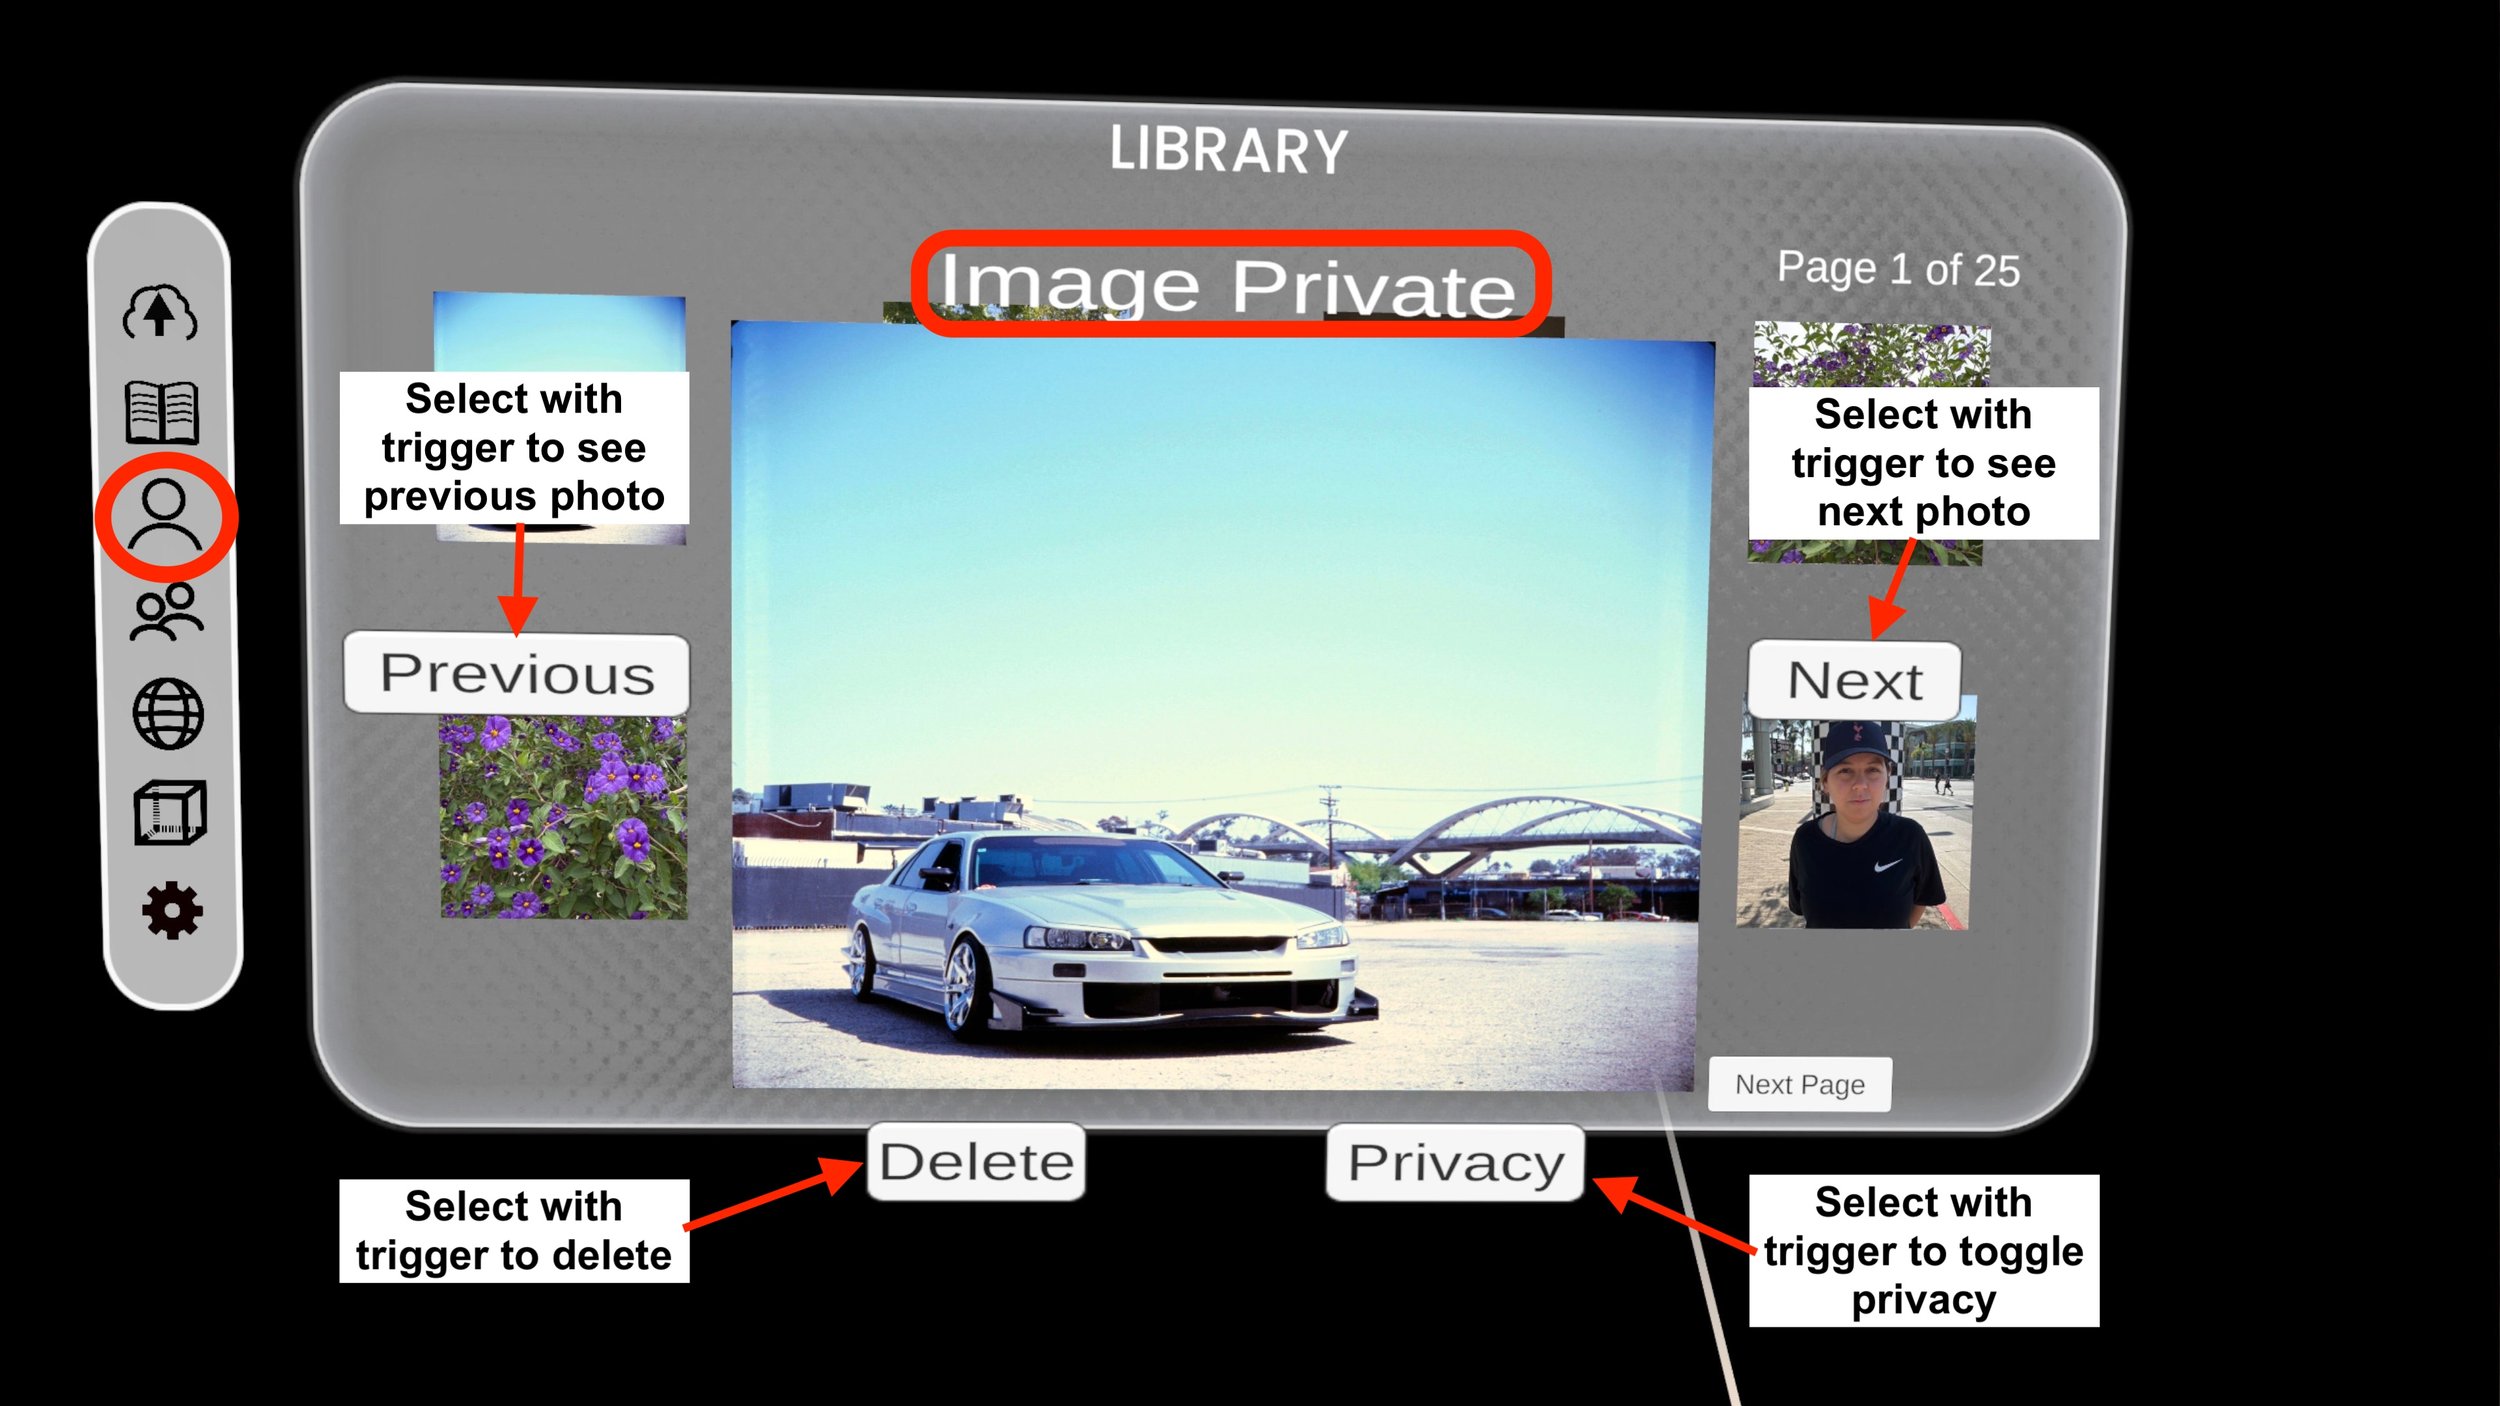
Once expanded, you will have the option to delete the image or toggle the image privacy.
Making an image Public will display the photo on your Profile and push the image to the Feed.
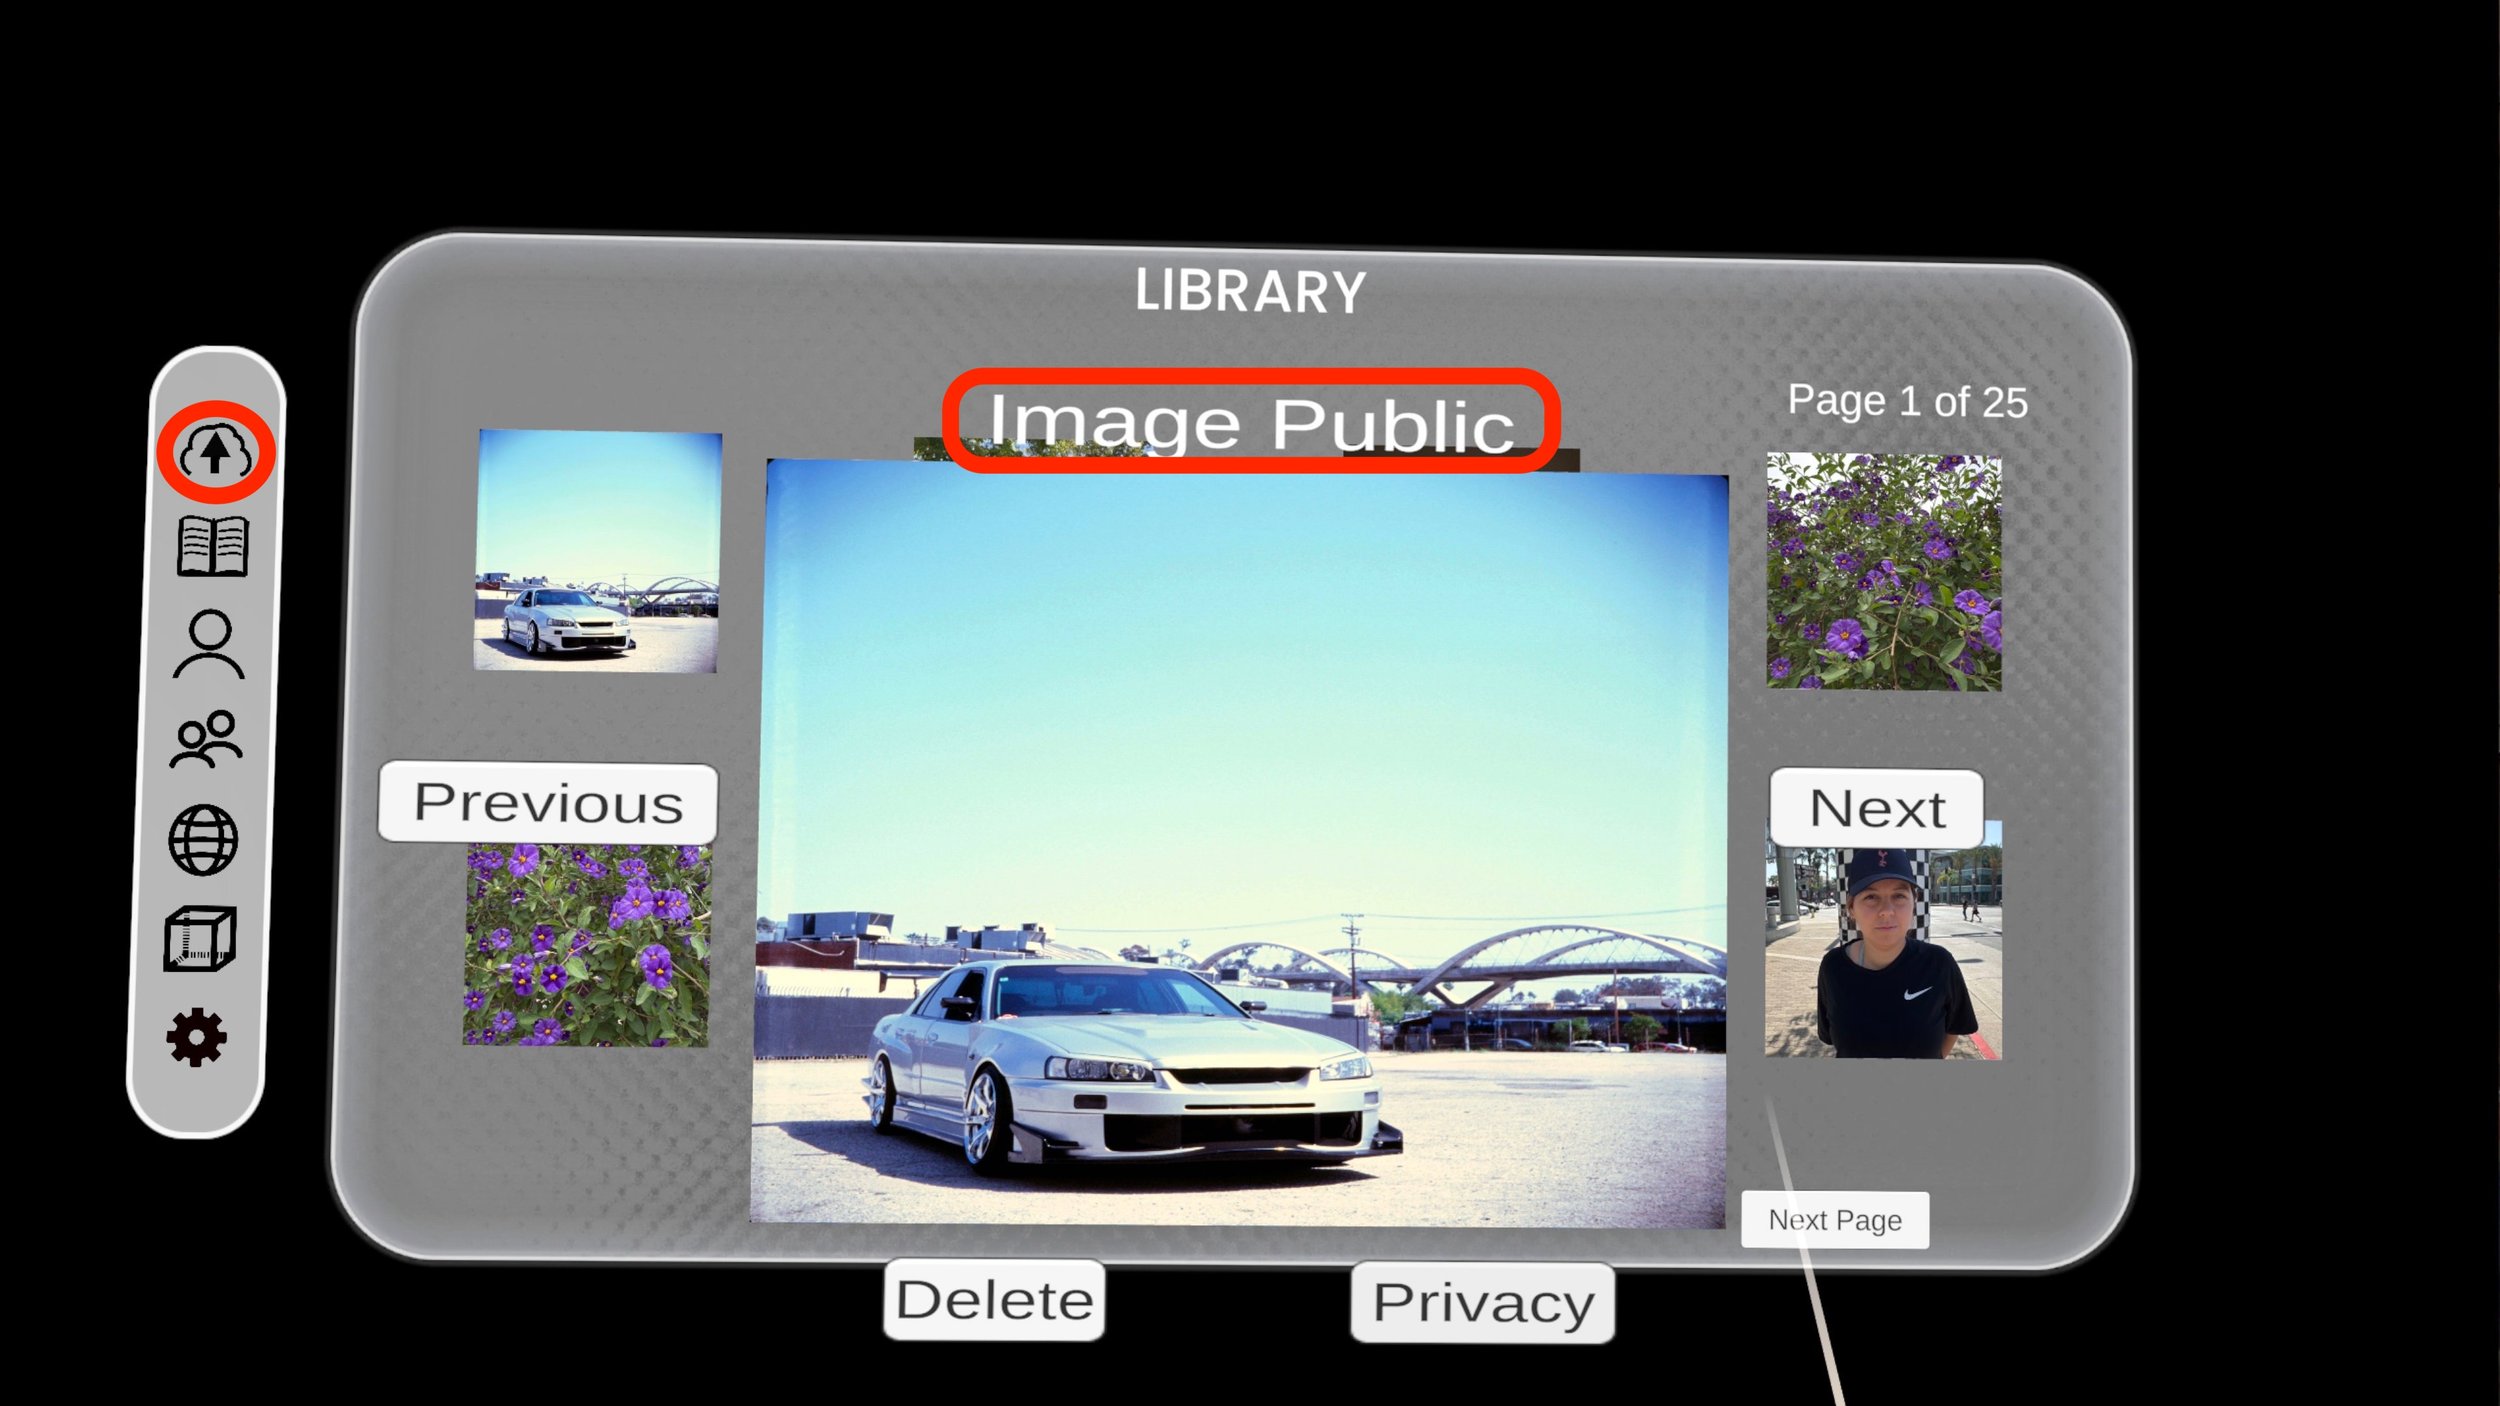
Deleting an image removes the image from your Library and Profile. After selecting “Delete,” it will ask for confirmation before deleting the image.


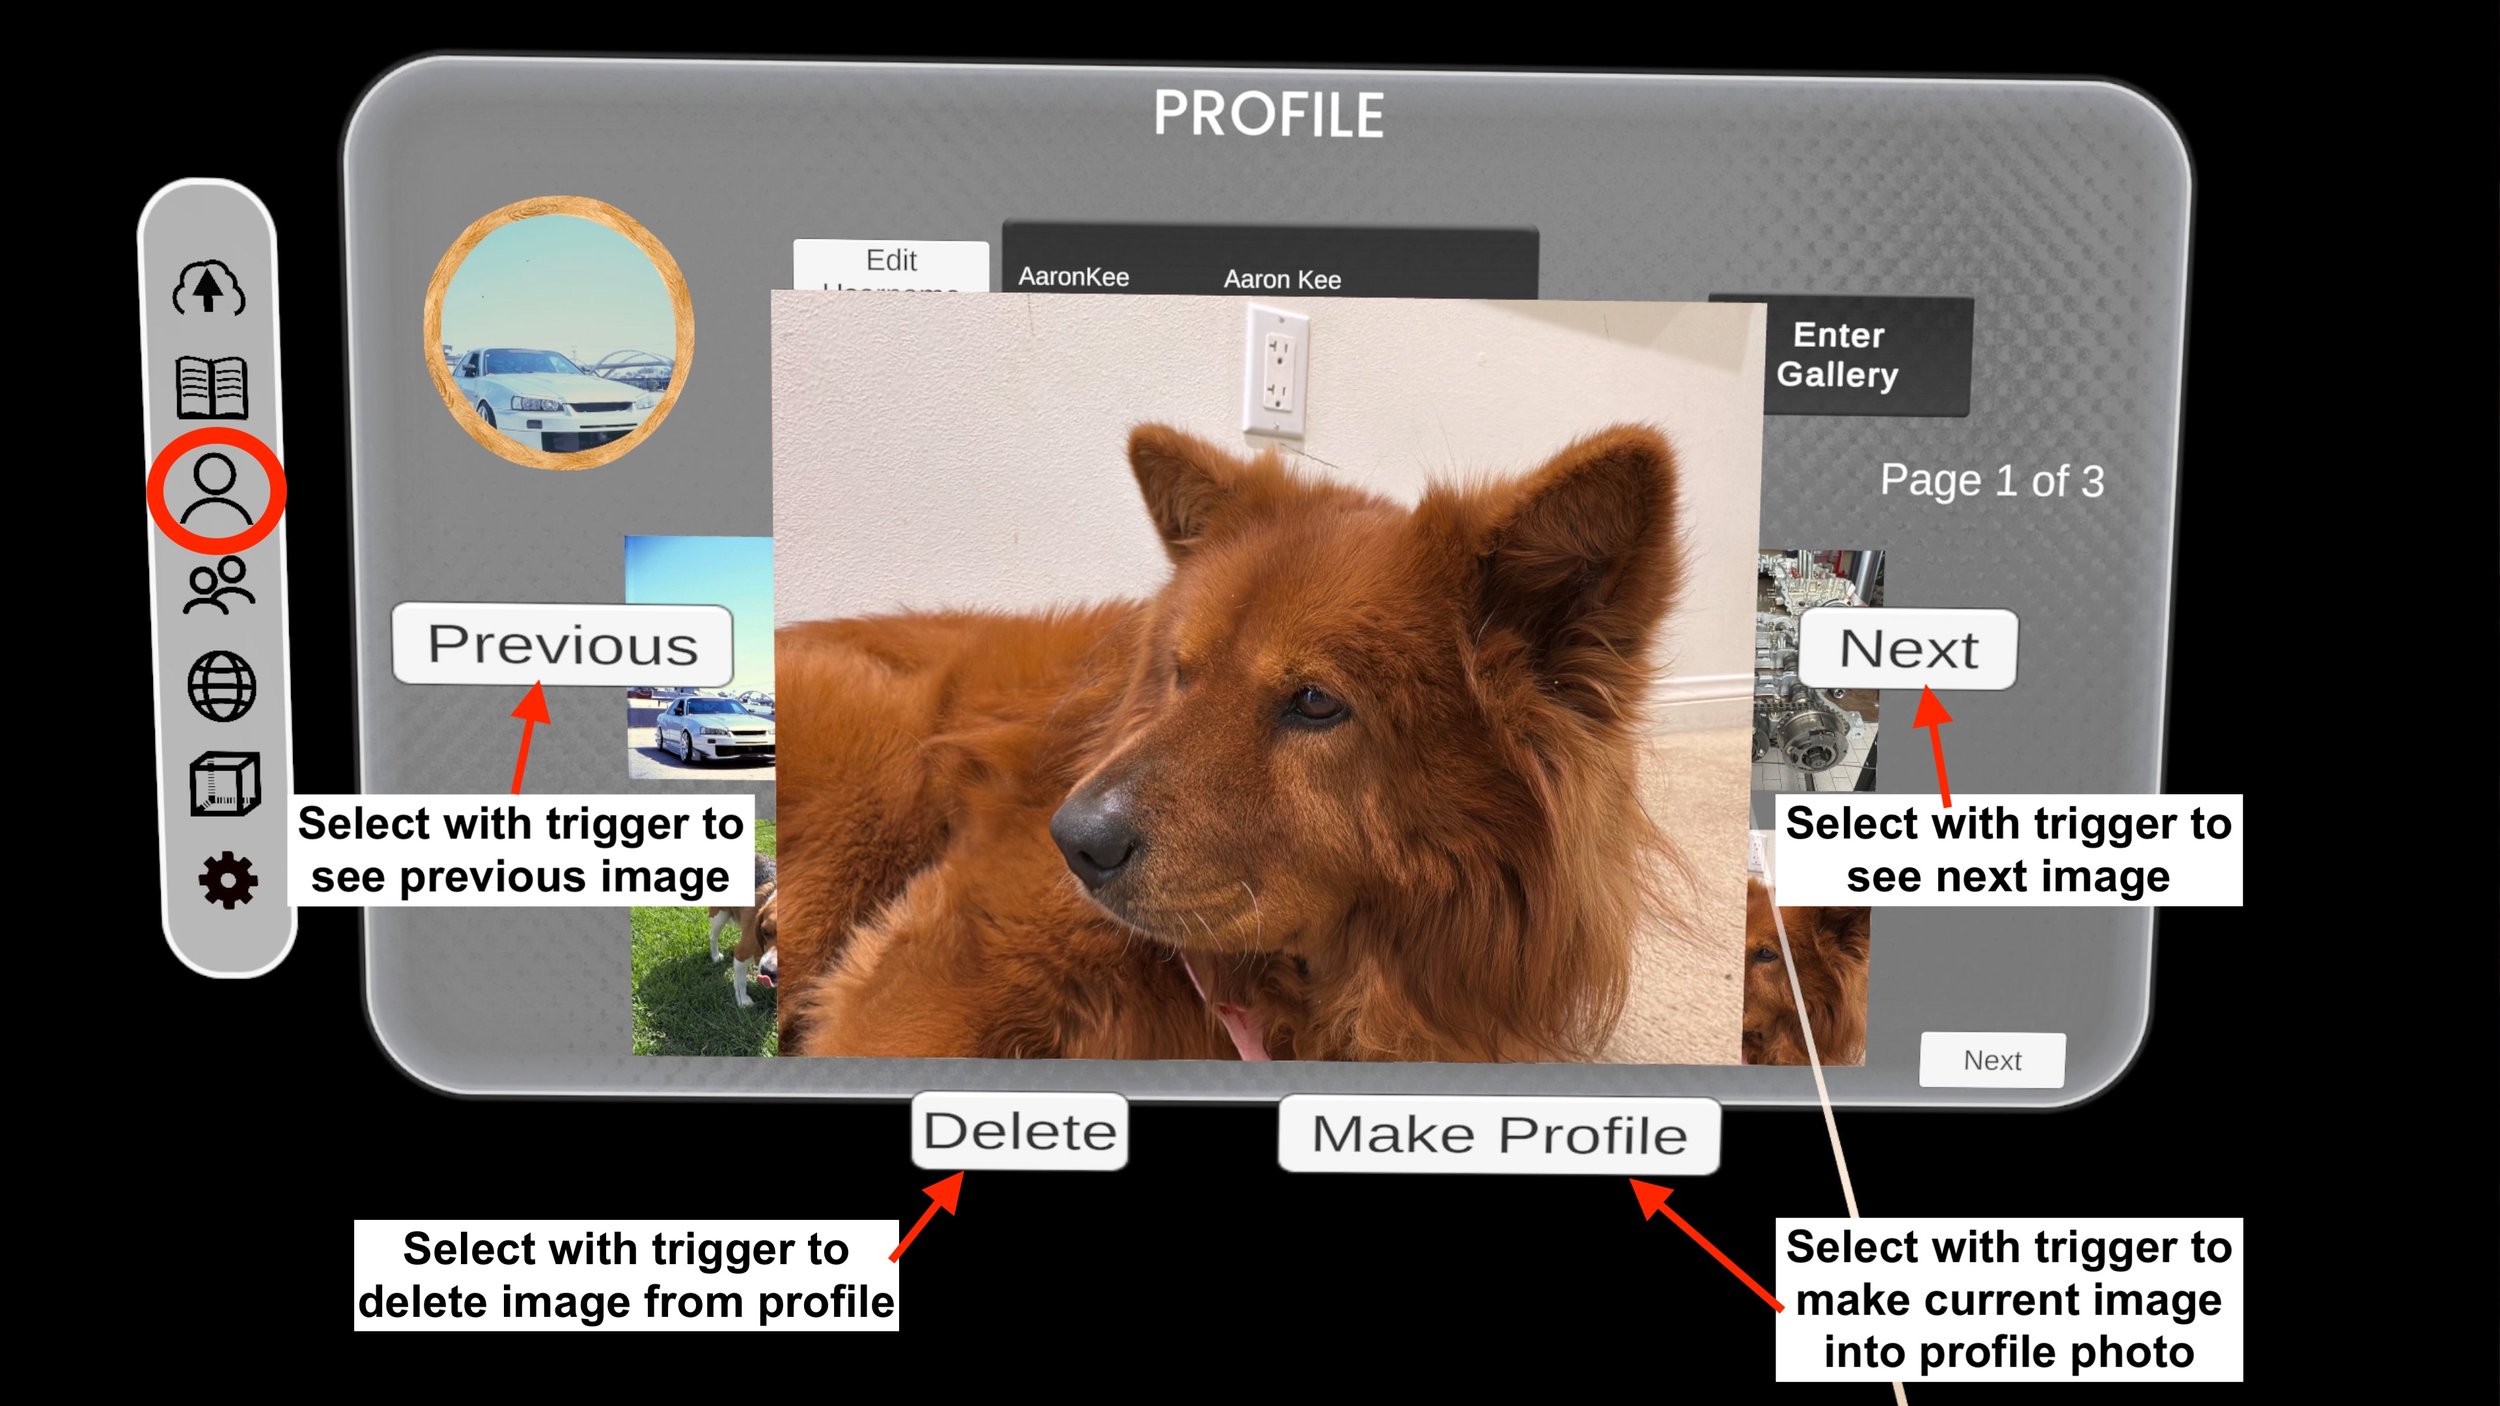
9. Profile
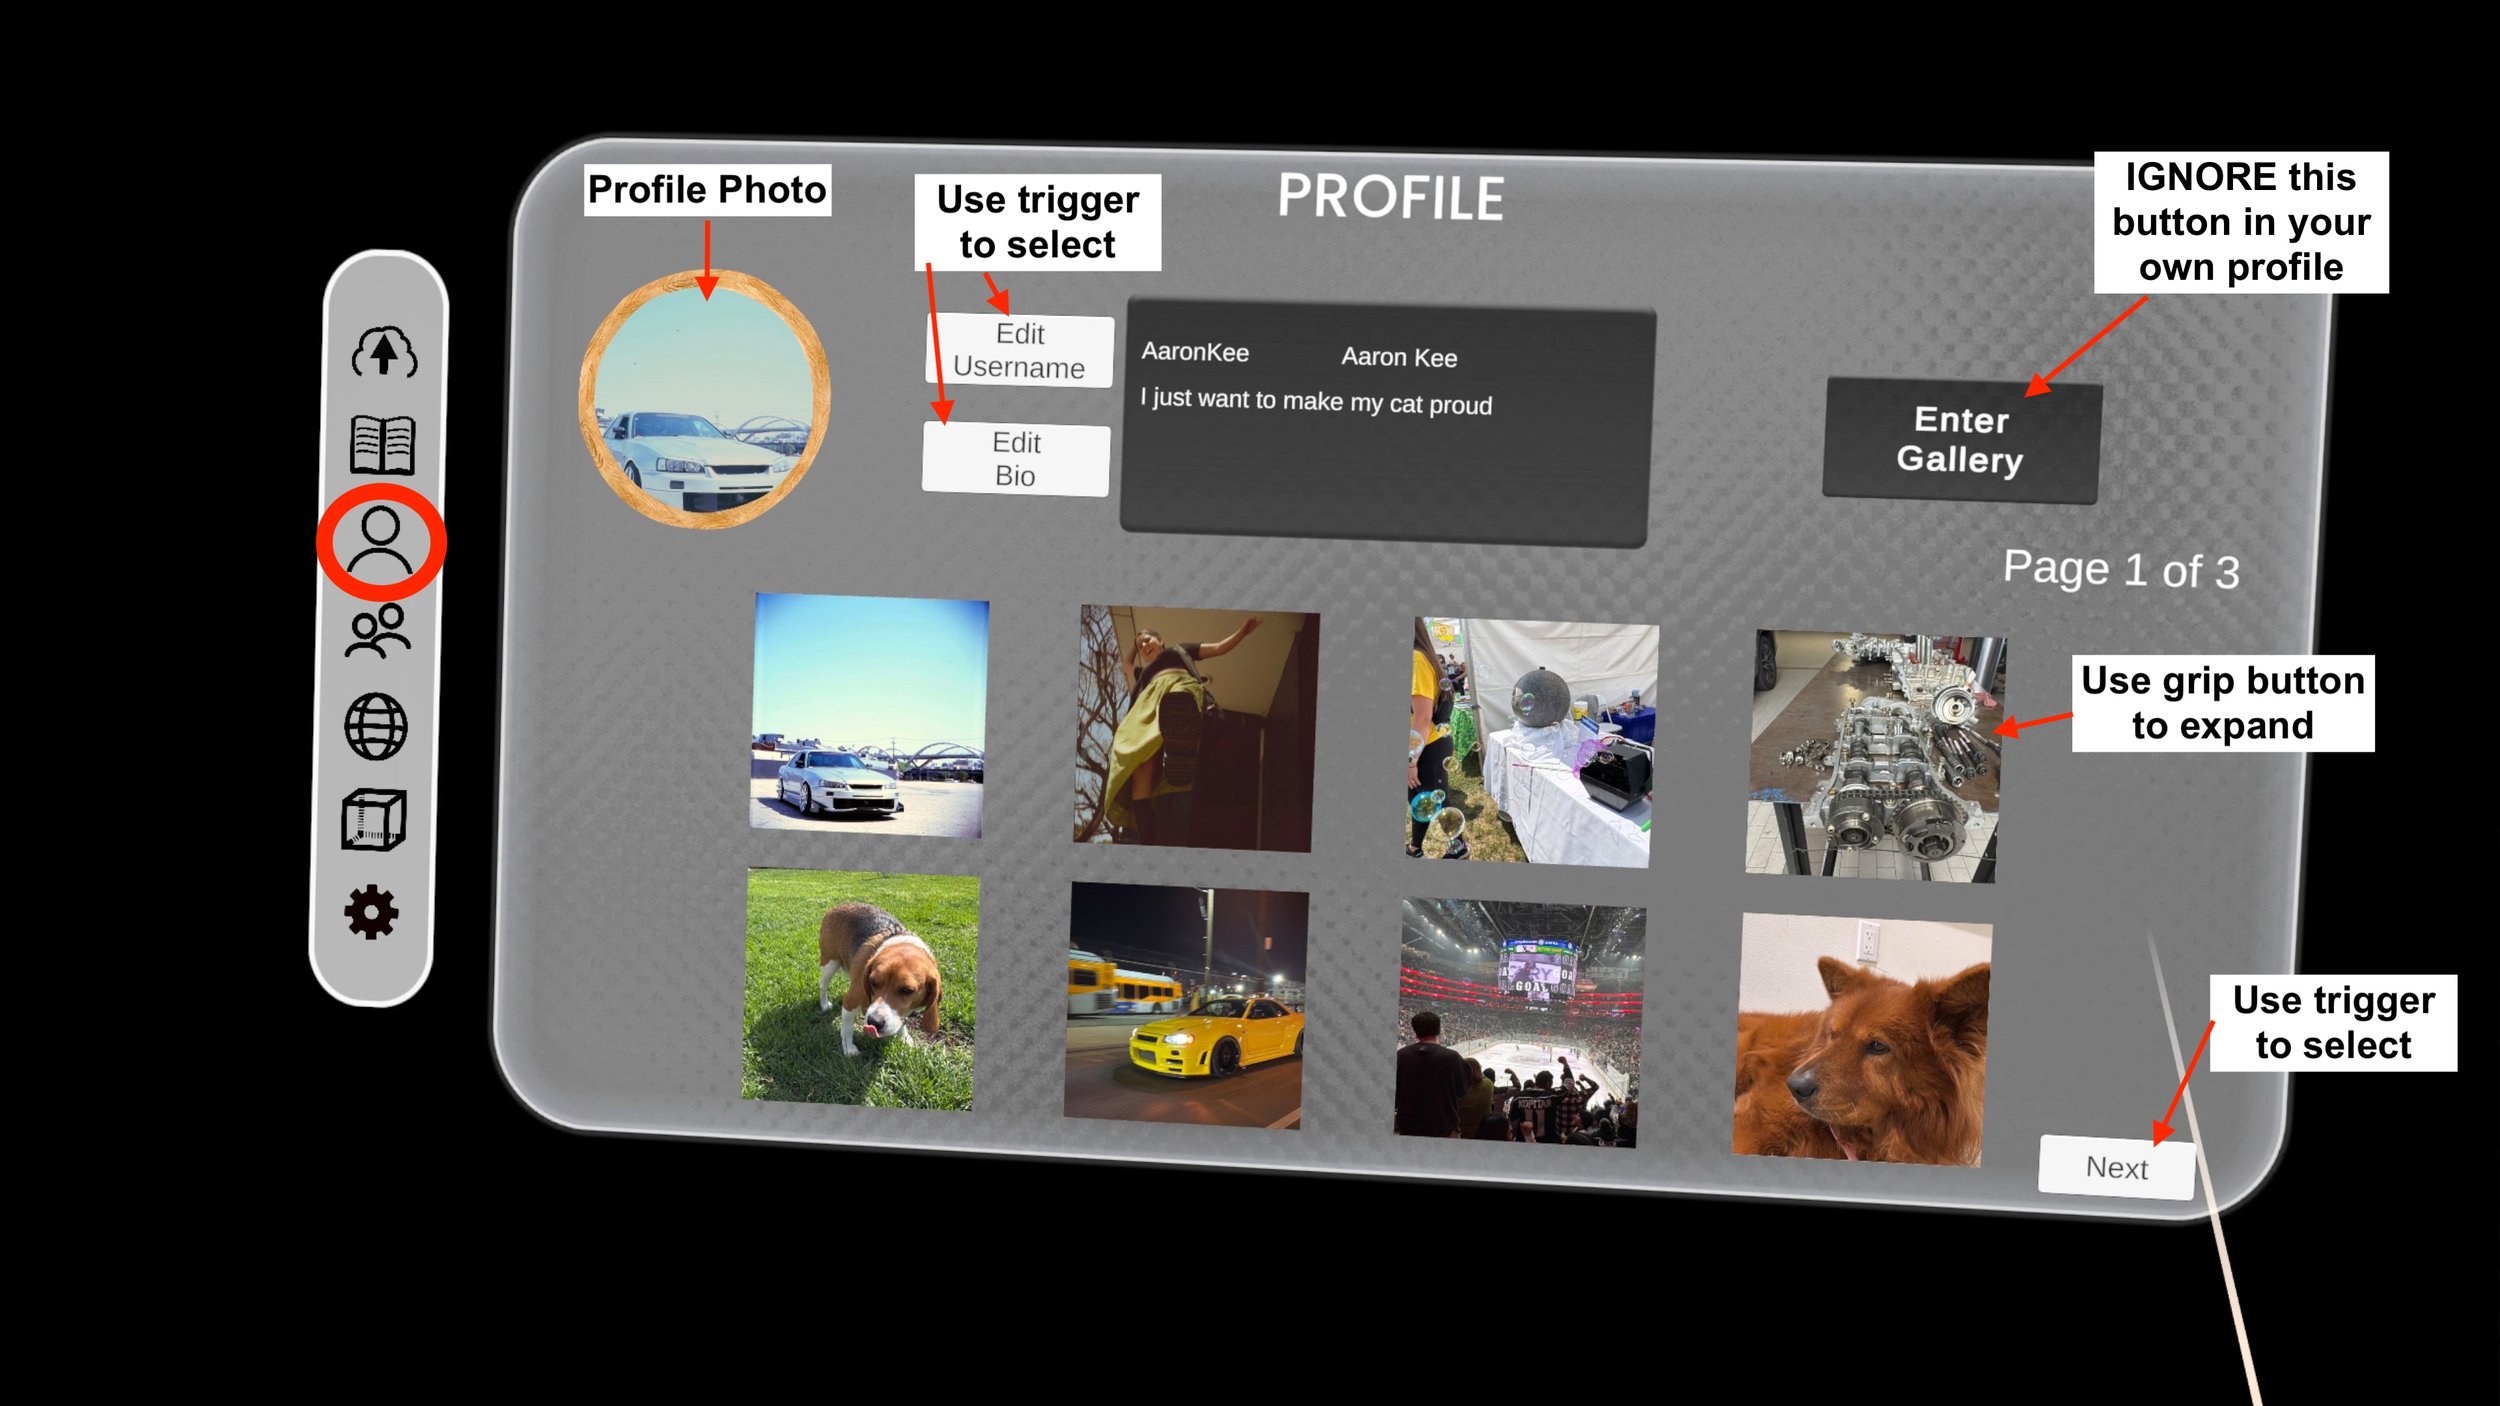
Your Profile is where your Public Photos will be visible to others. Public Photos are also pushed to the Feed.
-To change your Profile Photo: In the Profile page, expand the photo (Grip Button) that you wish to use for your profile.
-Select “Make Profile.”
-After a moment, the selected image should appear in the appropriate area.

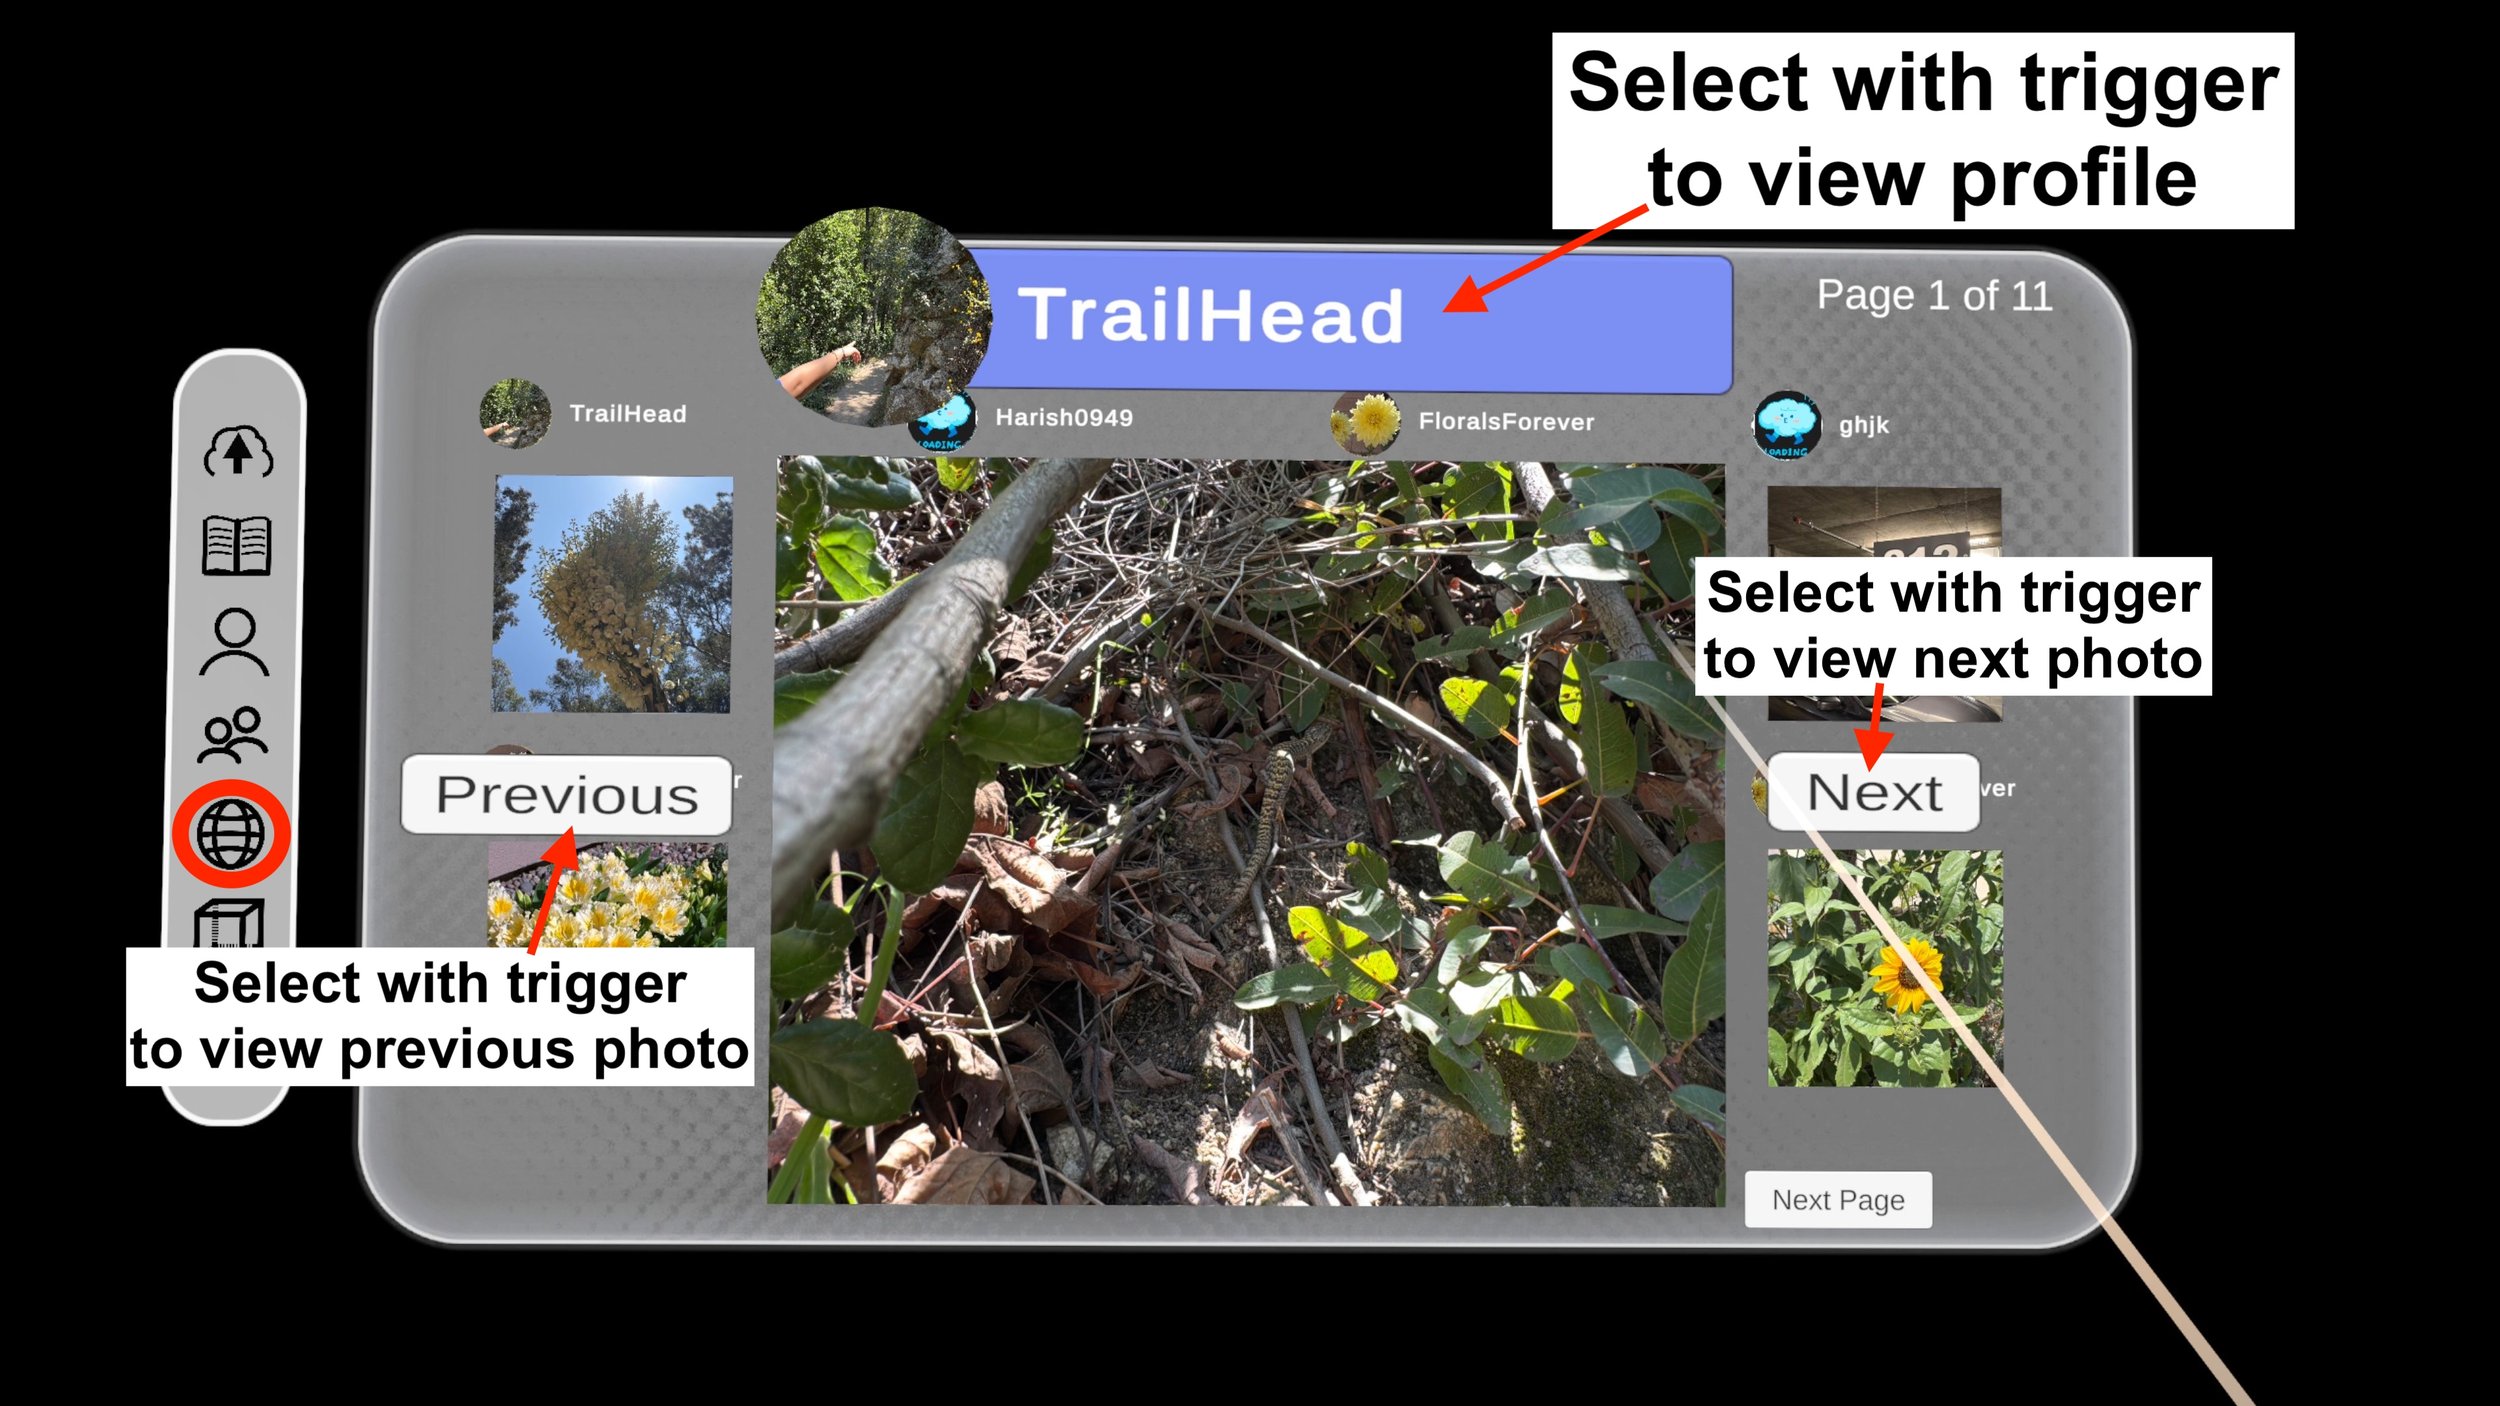
10. Feed
The Feed is where you can view photos from other Profiles.
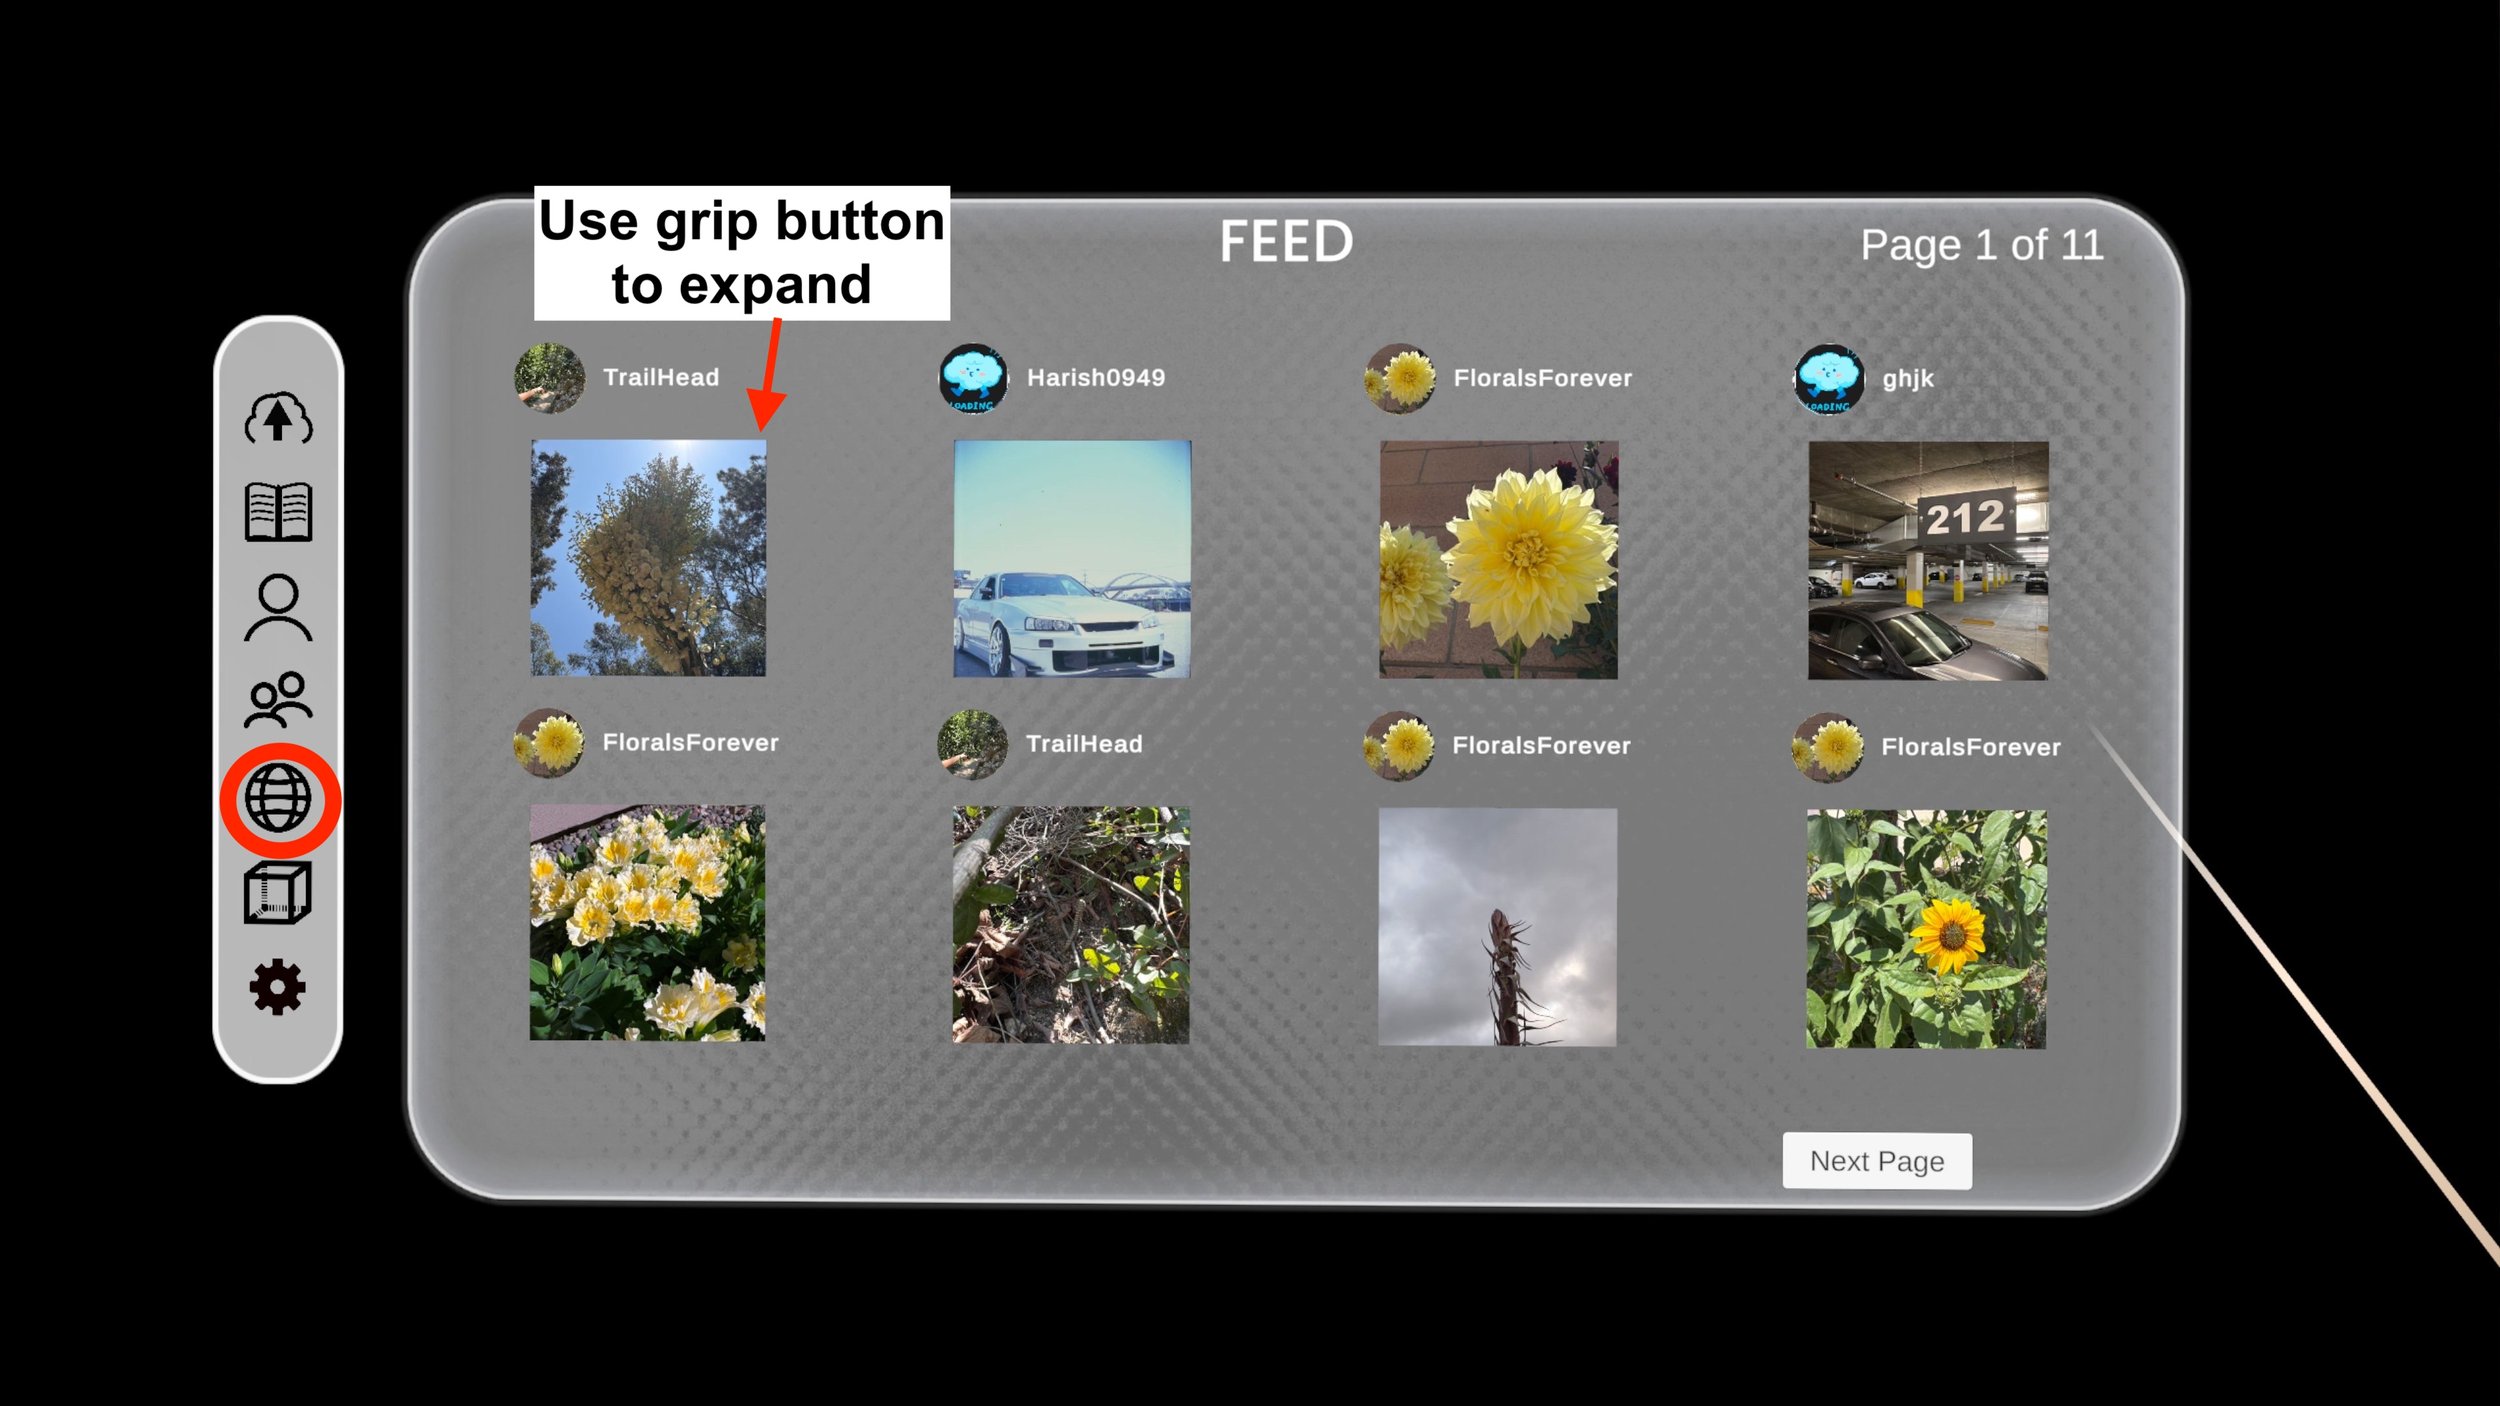
To expand an image, use the grip button.
Once expanded, you can go through the images by using the “Next” or “Previous” buttons.
Expanded images will display the profile information of the User that uploaded the photo.
To visit that User’s Profile, select their Username with the trigger.
Once inside the Profile, you can follow the User by selecting the “Follow” button with the trigger.
Followed profiles will appear in your Followers Page.
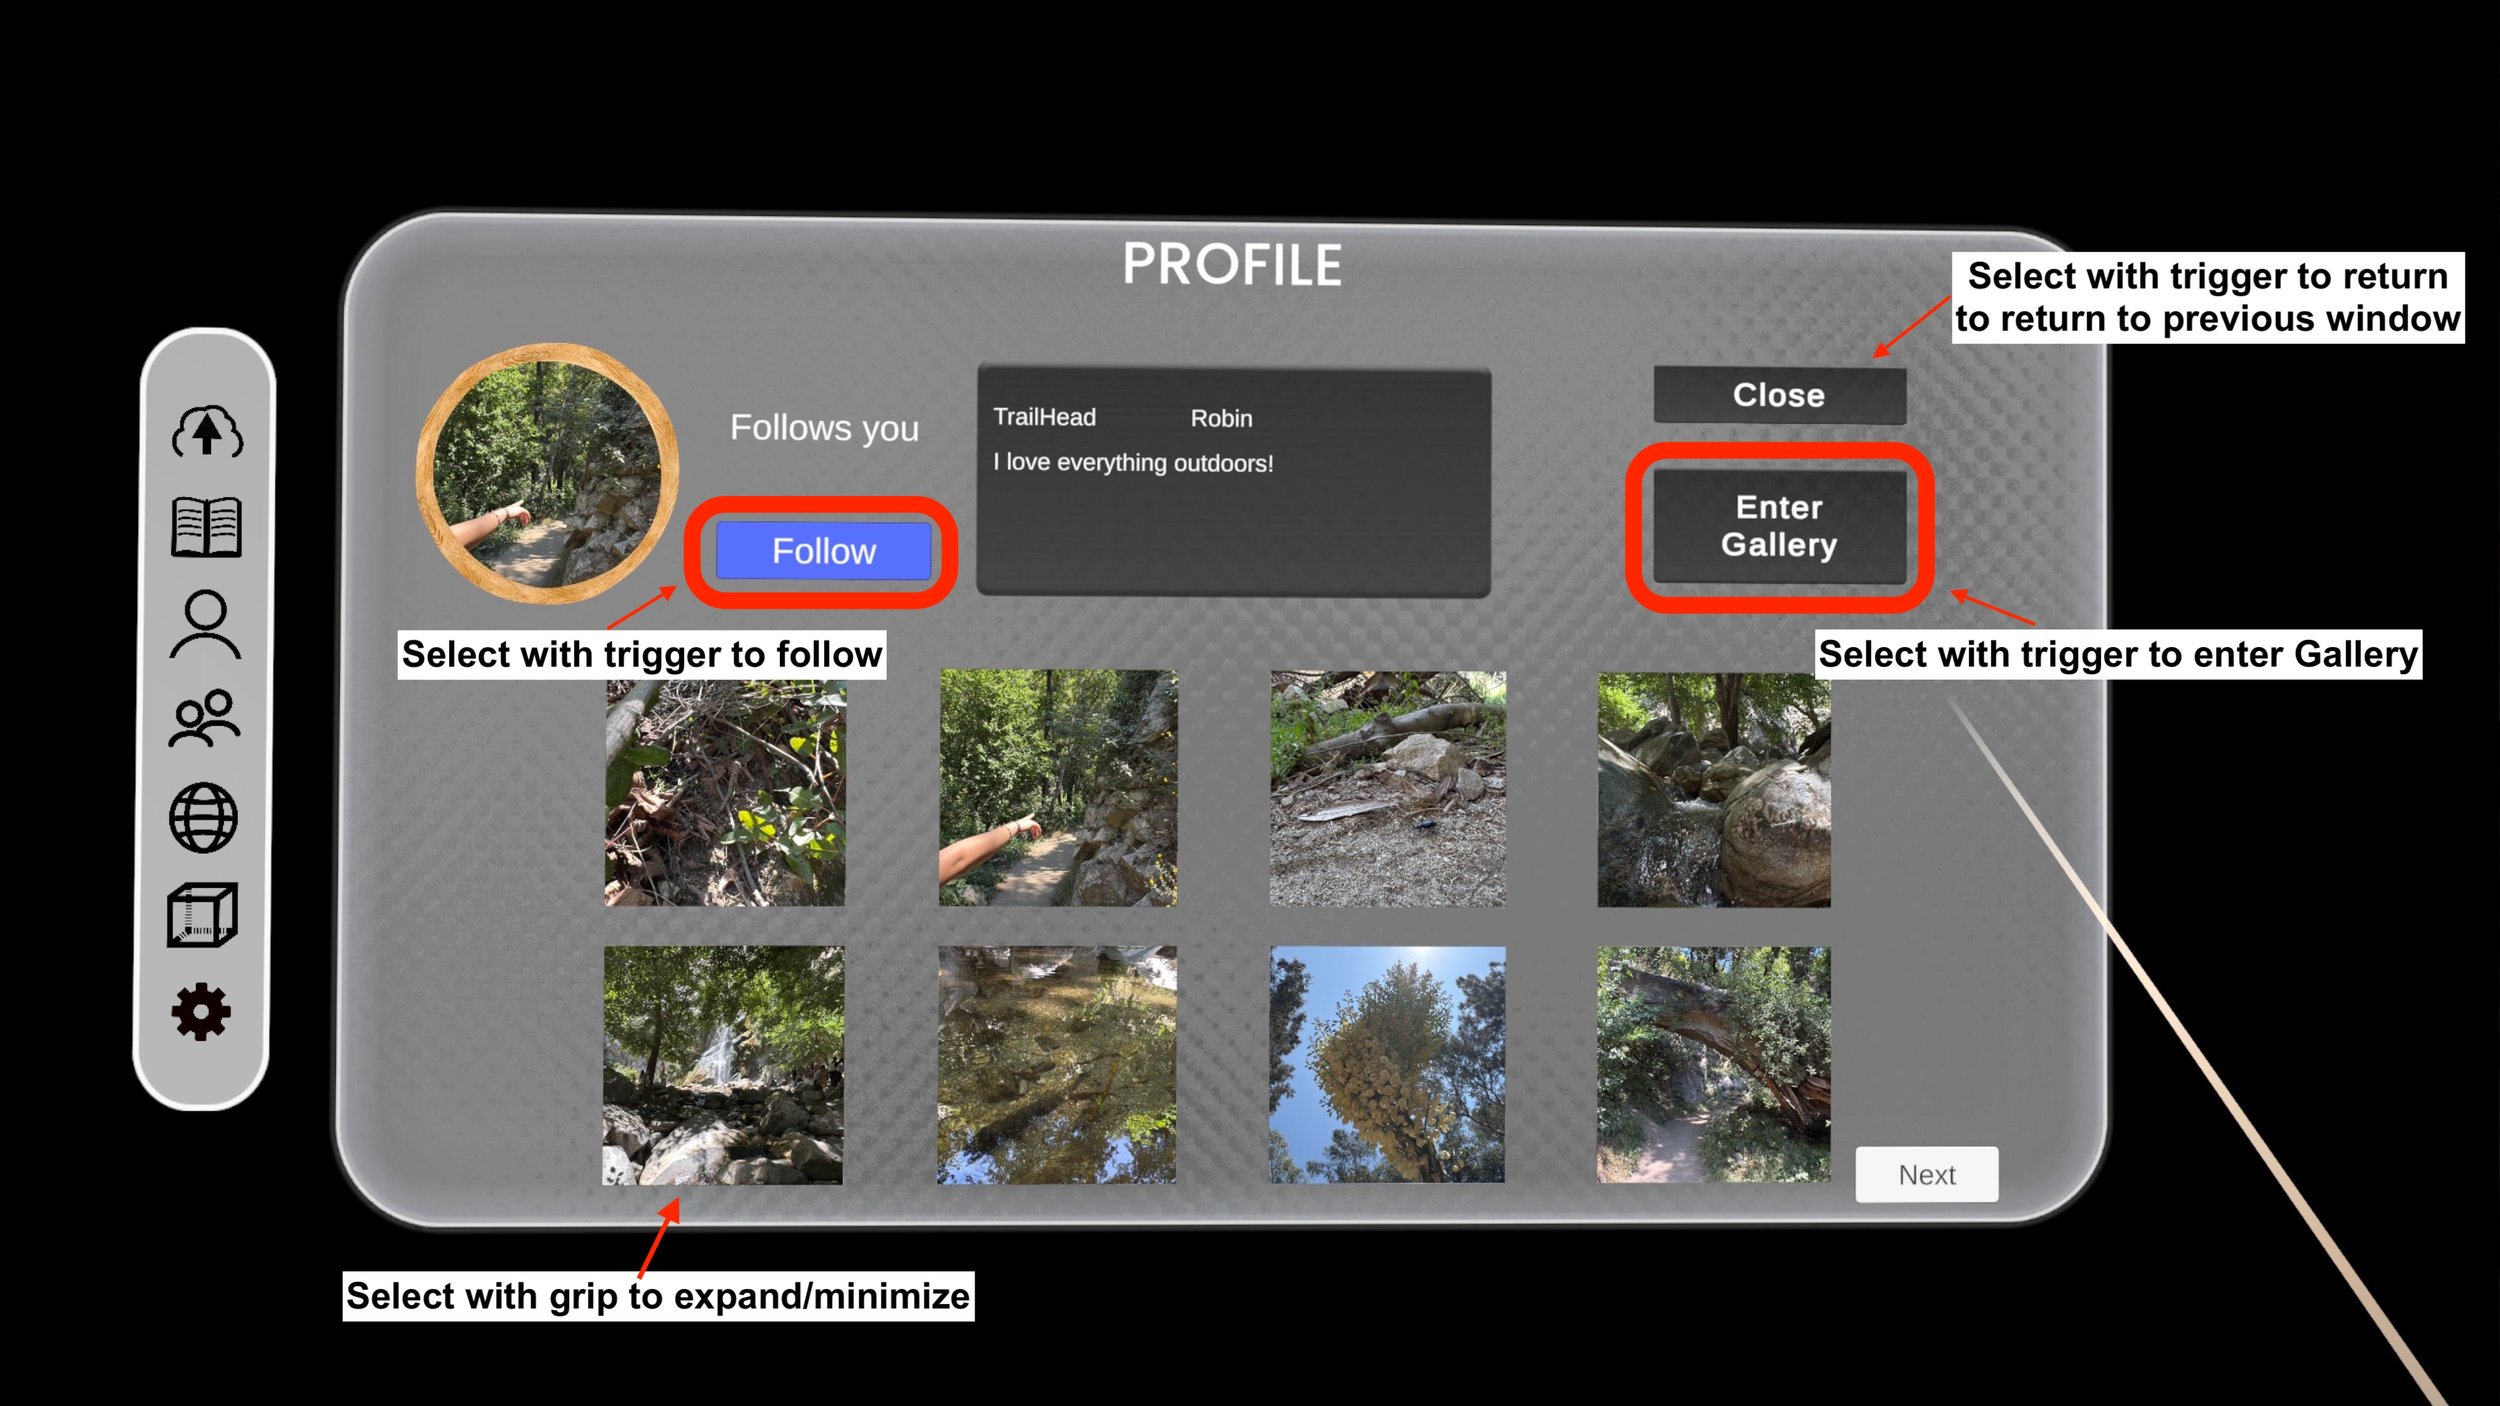


11. Gallery
The Gallery is where you can display 8 of your favorite public images for anyone to visit.
There are 2 navigation options in the Gallery: Teleportation or joystick control.
To teleport inside the Gallery, point your Right Controller at the floor where you’d like to teleport to. Then, push the Right Joystick forward and release.

To rotate your view without turning your head, push the Right Joystick either to the right or left, depending on where you’d like to turn.
To rotate 180 degrees, push the Right Joystick backwards towards your body.
To move using Joystick controls, use the Left Joystick to navigate.
To add images to your Gallery:
-Select the Gallery icon in the side menu with the trigger.
-Once in the Gallery, select a frame using the grip button.
-A window will open, showing your public images.

-Use the trigger to select a photo.
-After a moment, the photo will appear in the frame.
***WHEN POPULATING YOUR GALLERY FOR THE FIRST TIME, THE IMAGES MAY NOT SAVE TO YOUR GALLERY. EXIT THE GALLERY AND RE-ENTER TO CONFIRM YOUR IMAGES WERE SAVED. FILL IN THE BLANK FRAMES AND REPEAT UNTIL THE GALLERY LOADS ALL OF YOUR IMAGES CORRECTLY. WE ARE WORKING ON THIS ISSUE.***

12. Settings
The Settings Menu allows you to change the passthrough settings, motion controls, and log out.

Toggle the passthrough settings to reveal or obscure your enviromnent.

To log out, select the “Logout” button with the trigger and confirm your choice. To log back in, quit the app and enter your login information.
